Connected Games Programming | MSc Game Development (Programming) | Kingston University
"Let Em Cook" is a thrilling First-Person Shooter Cooking extravaganza, blending the chaotic fun of Overcooked with the strategic intensity and camaraderie of Valorant. Get ready to step into the kitchen battlefield, where delivering dishes is just as crucial as dodging enemy fire!
Your mission? Whip up culinary masterpieces while navigating through the frenzied chaos of competitive gameplay. But beware! Your rivals are lurking around every corner, eager to snatch your delectable creations right from under your nose. It's a culinary showdown where every toss counts!
But wait, there's more spice to the mix! In "Let Em Cook," strategic sabotage is not just encouraged, it's rewarded! Unleash your inner culinary ninja as you plot cunning maneuvers to outwit and outmaneuver your opponents. With each sneaky move, you'll inch closer to victory and culinary glory!
So grab your spatulas, sharpen your knives, and get ready to unleash your culinary prowess in "Let Em Cook" - where the heat is on, and the competition is sizzling hot!
Setting up a dedicated (or master) server using the Unreal Engine necessitates installing the source build of the engine rather than relying on binaries from the Epic Games Launcher. Therefore, the initial step was to evaluate this process to determine the feasibility of moving forward with Unreal Engine.
As with everything Unreal and most things code related, things never work out the way you want them to the very first time.
During the attempt to implement this process using the latest version, 5.3.2, compile errors unique to this version surfaced. While some of these issues were addressed with solutions found in the forum, a roadblock was encountered with others, leading to a standstill in progress.
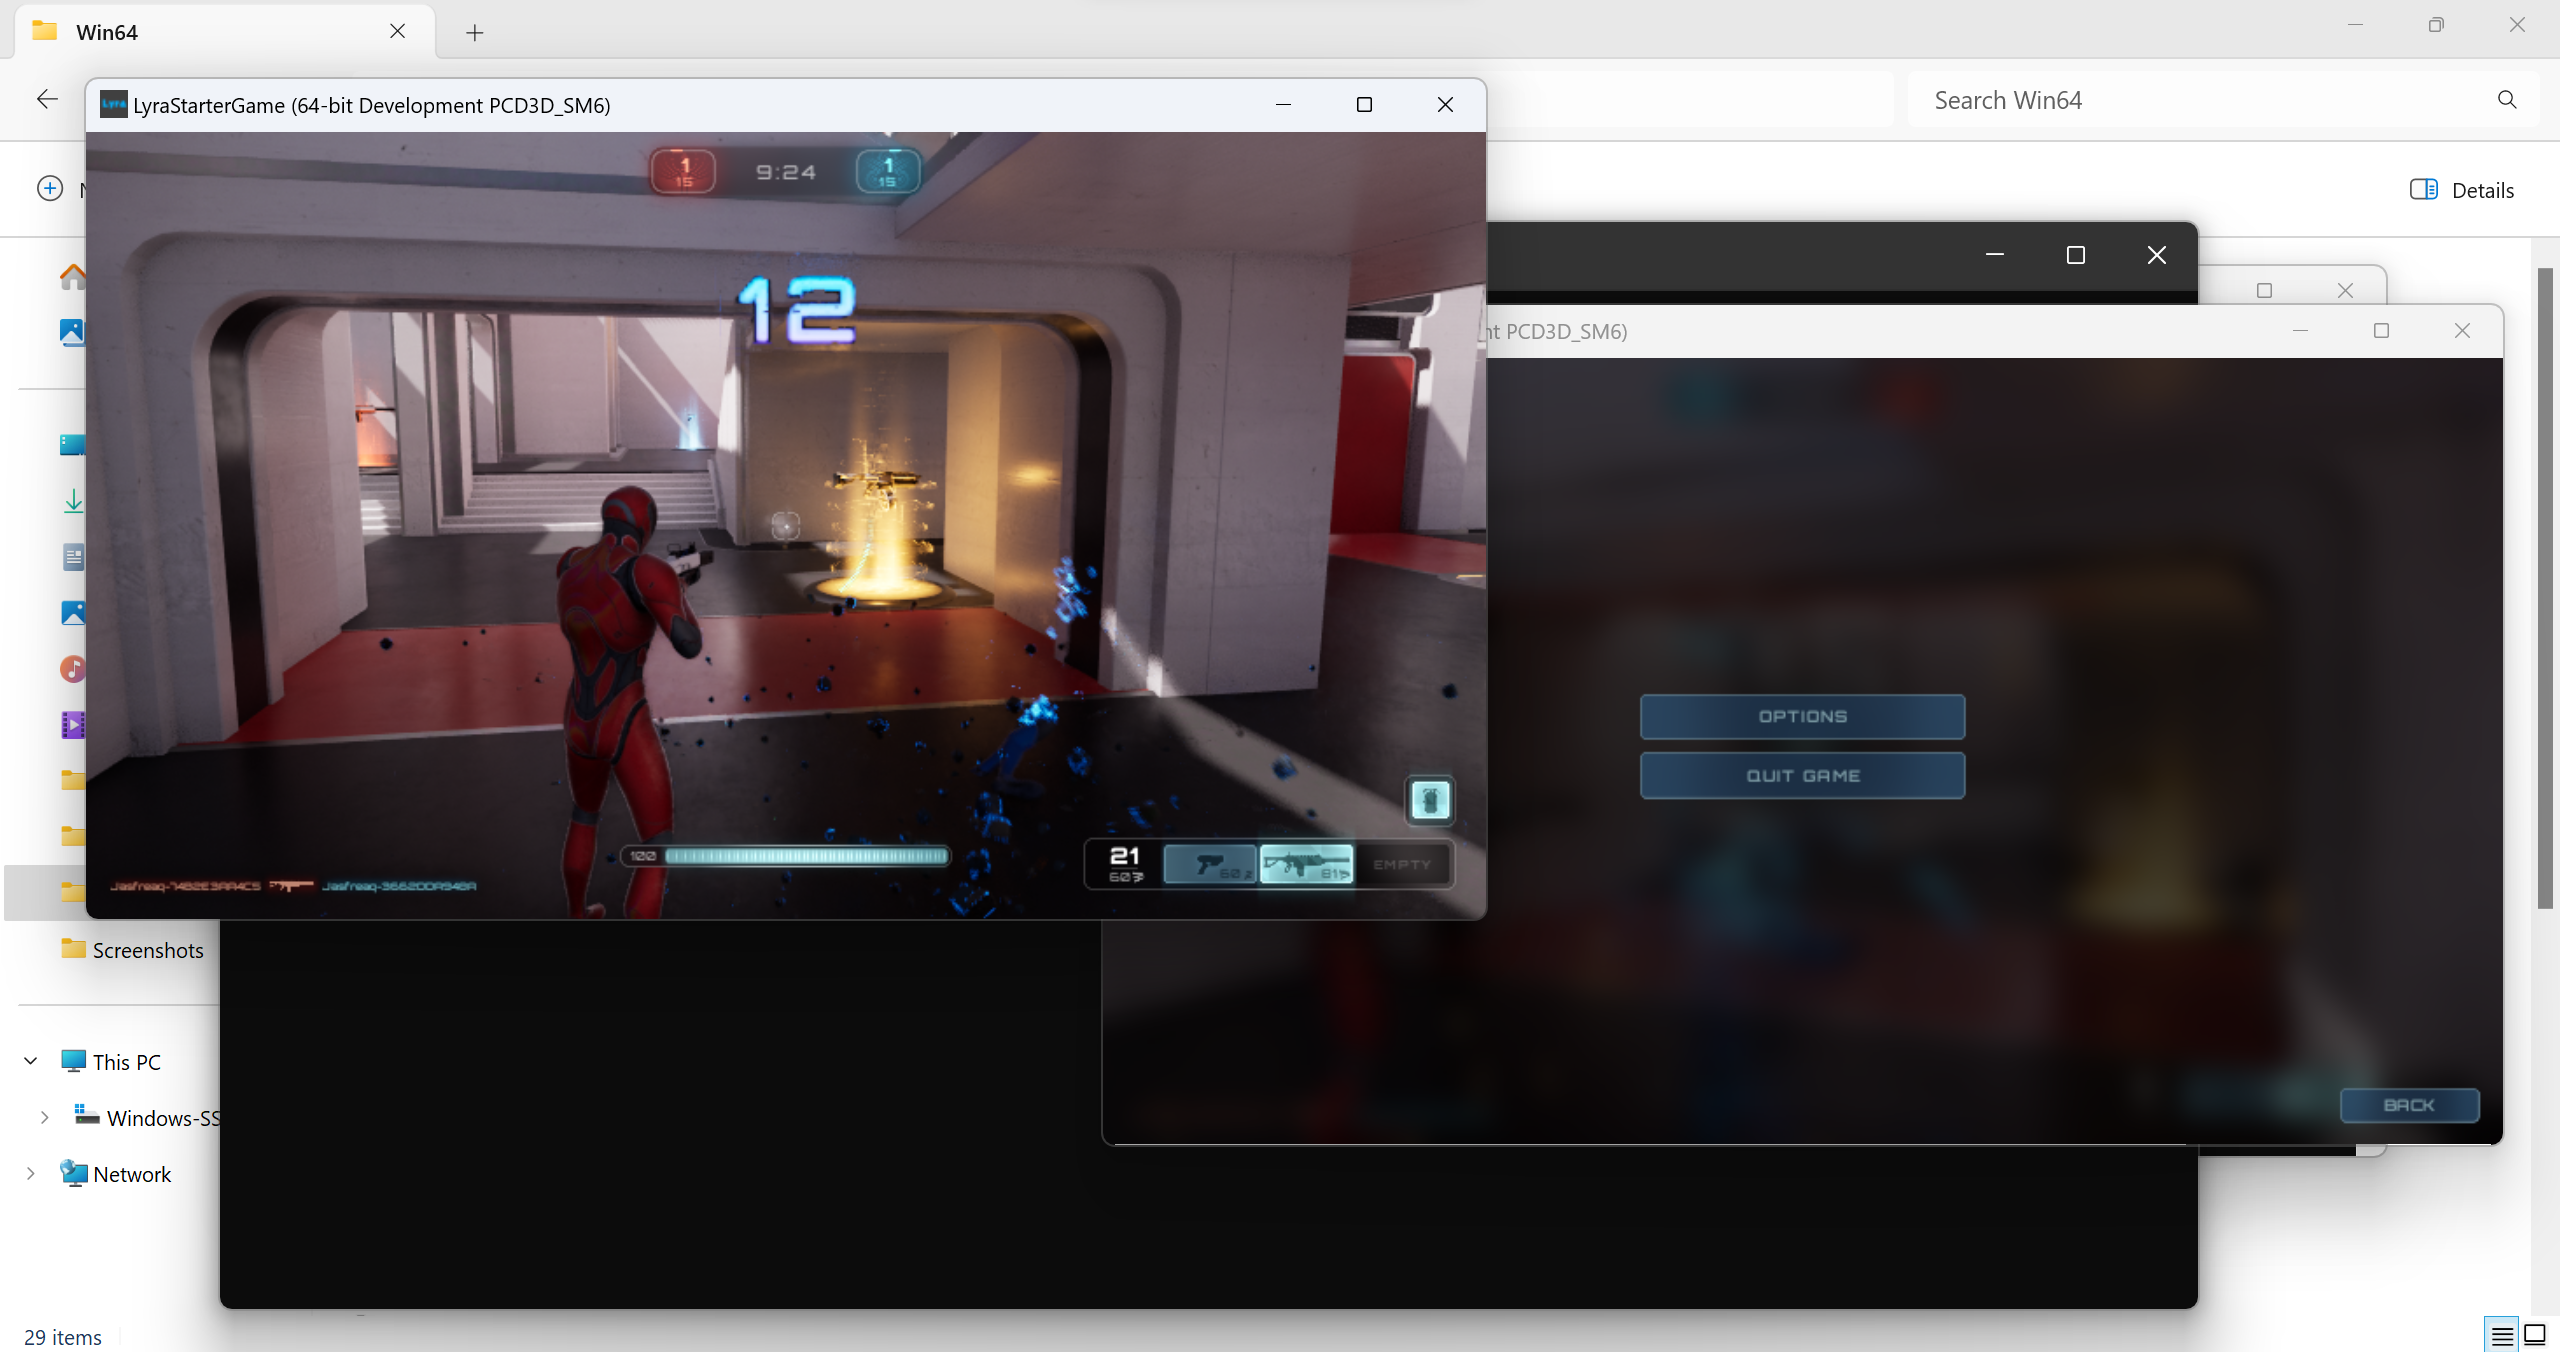
Consequently, the next logical step involved reinstalling a different version of the engine. In doing so, all components aligned seamlessly, resulting in a successful implementation. Here are some screenshots showcasing a functional multiplayer build with a dedicated server for Epic's LyraStarterGame project.
Doing a master's is hard. There are numerous tasks you need to stay ahead of. As much as I wish only to dive into this project, unfortunately I have another module's classes to attend and assignments to do.
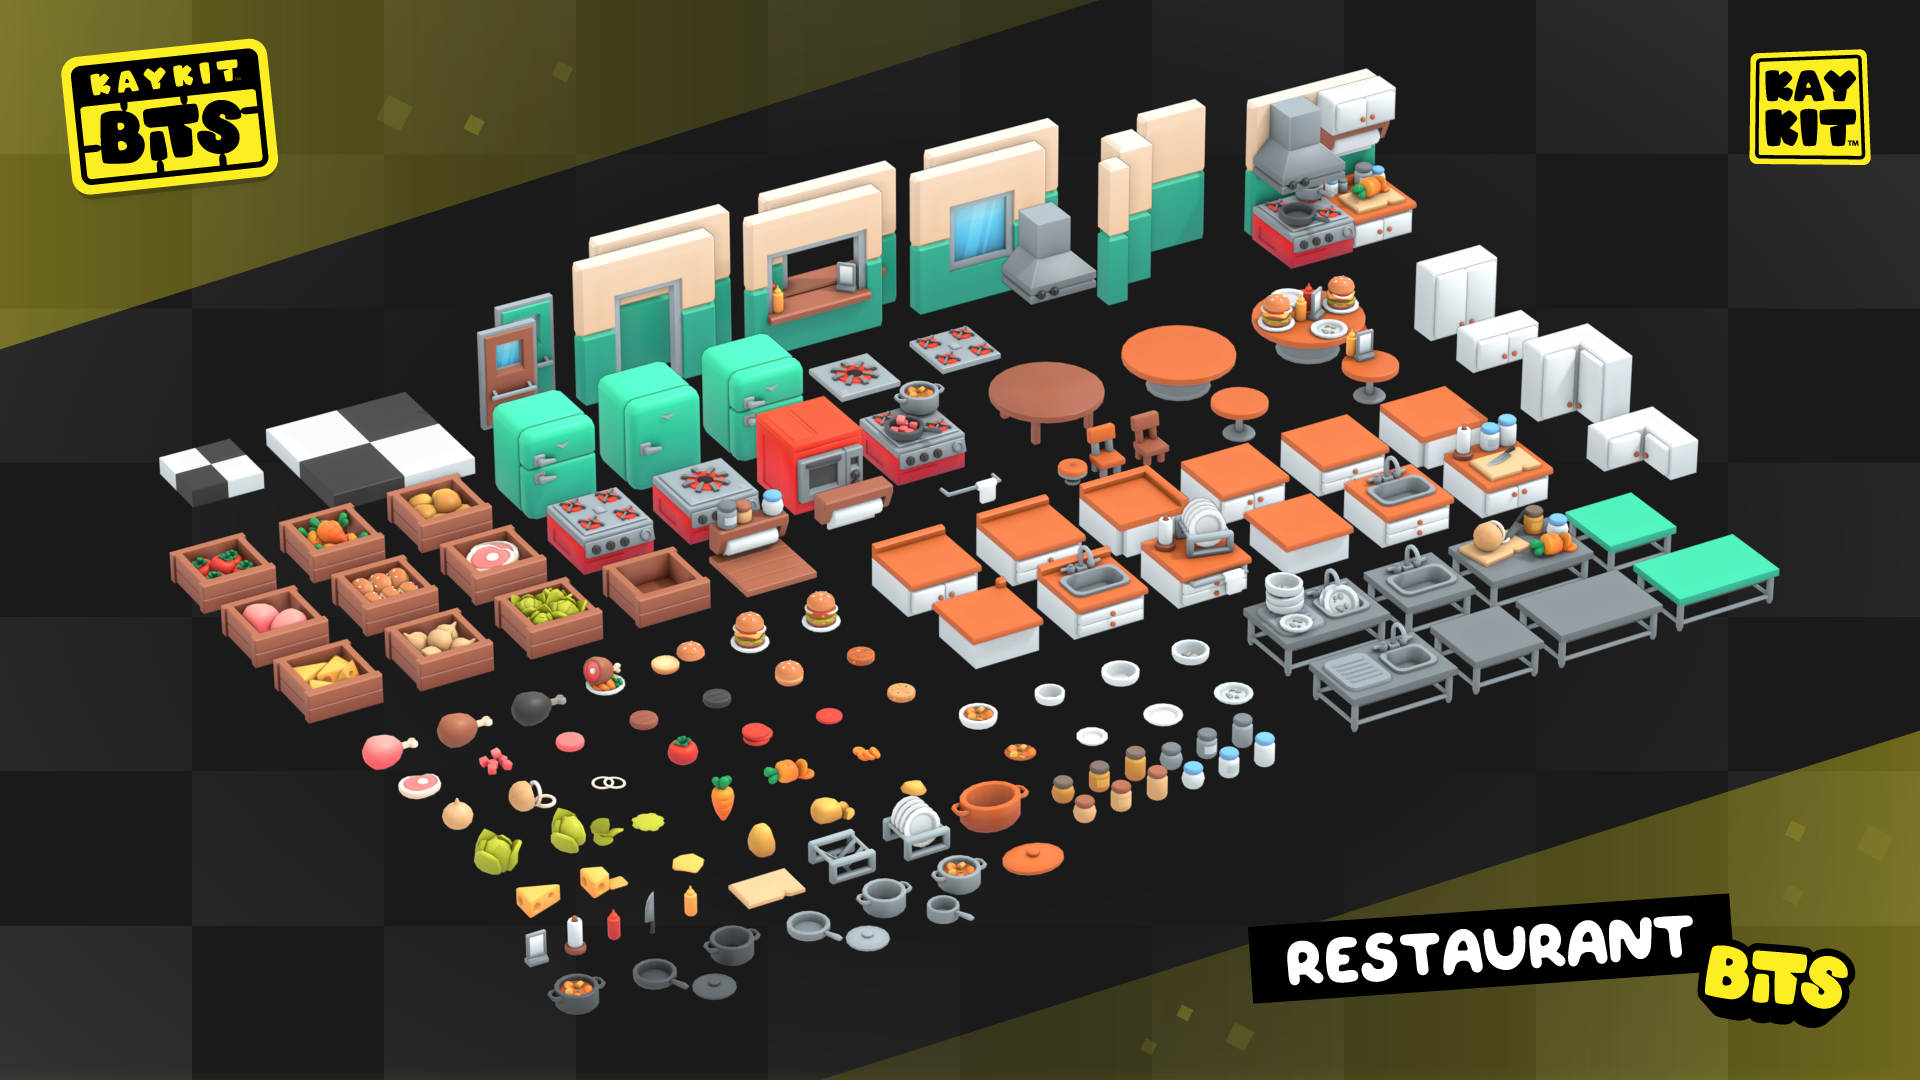
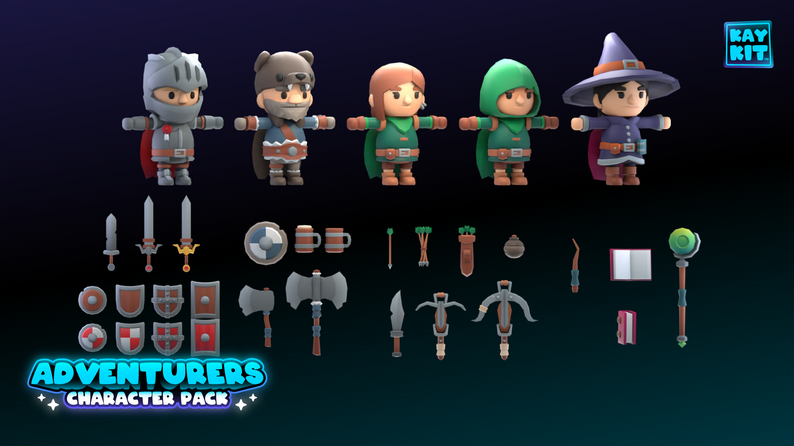
As a result, progress on this update has been limited. Firstly, we've secured a fantastic asset pack featuring restaurant assets for our game, very Overcooked-esque.
Next, I modified the default projectile class in Unreal Engine's Third Person template to be a knife instead.
A rifle that shoots knives? Yes please.
Finally, I reorganized the source folder to create a tidy nested structure for the code, rather than having all the files in a single location.
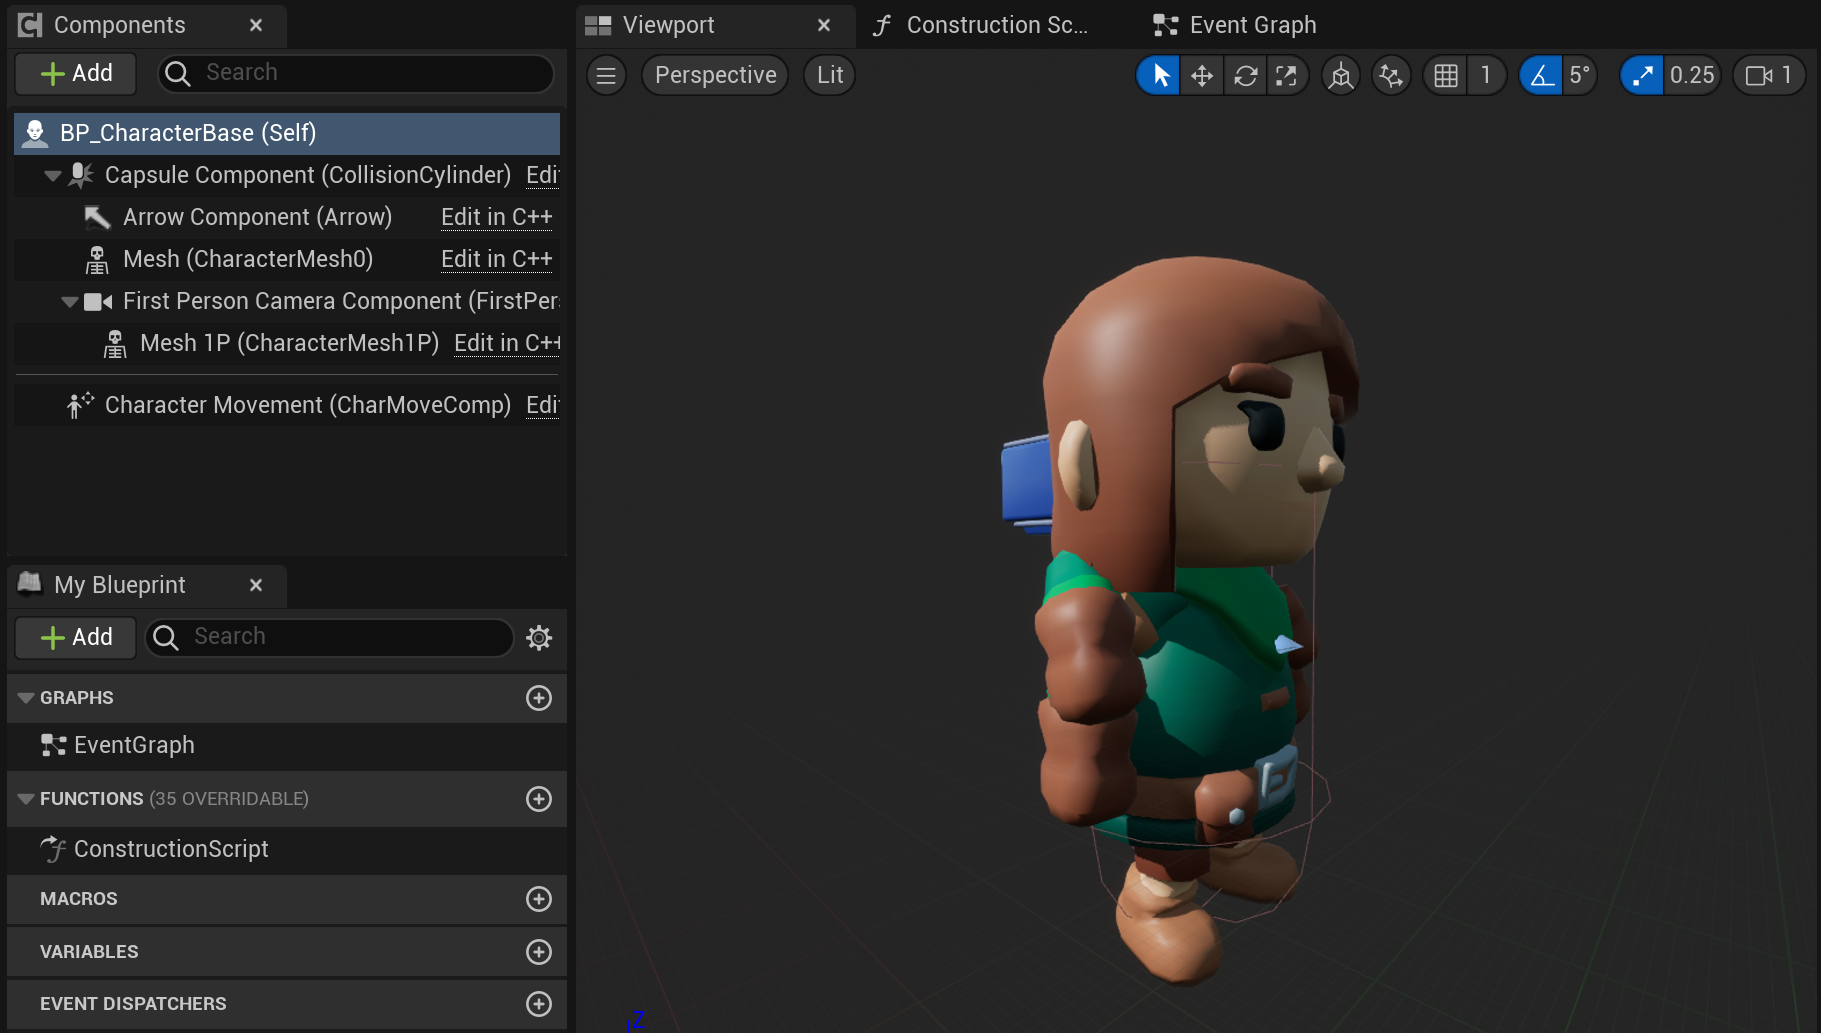
Another week, another blog. This time I have finished setting up the basic Character class. I removed all the code from the WeaponComponent class from the Third Person template and put it inside the Character. For the on-screen representation, I included an arm mesh visible exclusively to the client, while the primary character mesh remains visible to other players.
This setup is also convenient as it allows for the utilization of the same animation blueprint for both meshes, without increasing animation time overhead.
The wonderful character meshes were provided by the same artist as the restaurant pack, both found on itch.io.
The next thing I did was start brainstorming the system architecture for the primary gameplay mechanics.
We are making a first-person cooking game where players cook by throwing things into each other. For example:
Currently, I'm conceptualizing two primary classes:
When considering the structure of classes for the throwable objects, there's a choice between extending the projectile class in Unreal or opting for a more modular approach using Actor Components or an IThrowable interface.
To address this, I'm considering structuring the classes as follows:
By utilizing interfaces, we can maintain flexibility and modularity in our design while accommodating the diverse functionalities of the throwable objects and their targets.
Sadly, that's about it for this week's update, as I've been busy with my machine learning module. Hopefully I get to dive off into the deep end soon.
I've been able to make much more progress this week. Firstly, considering the structure of the classes, I decided to extend the Projectile class for the throwables instead of using an interface. This is because firstly I realised that at the moment, I don't require a separate IThrowable and IThrowTarget interface, as the first goal is to make the projectiles interact with each other.
I have a tendency to overengineer solutions, but I decided to prioritize implementation over extensive architectural planning at this stage. Therefore, I opted for the straightforward approach of merely extending the Projectile class, deeming it the most efficient decision at this point in time.
I wanted the control-flow for the launching of the Projectiles to be in-sync with the animations.
A simple custom AnimNotify was the perfect tool for the job.
I also changed the input actions from just a simple Shoot action to two separate Aim and Throw action. This is to add some nuance to the shooting mechanics of the game.
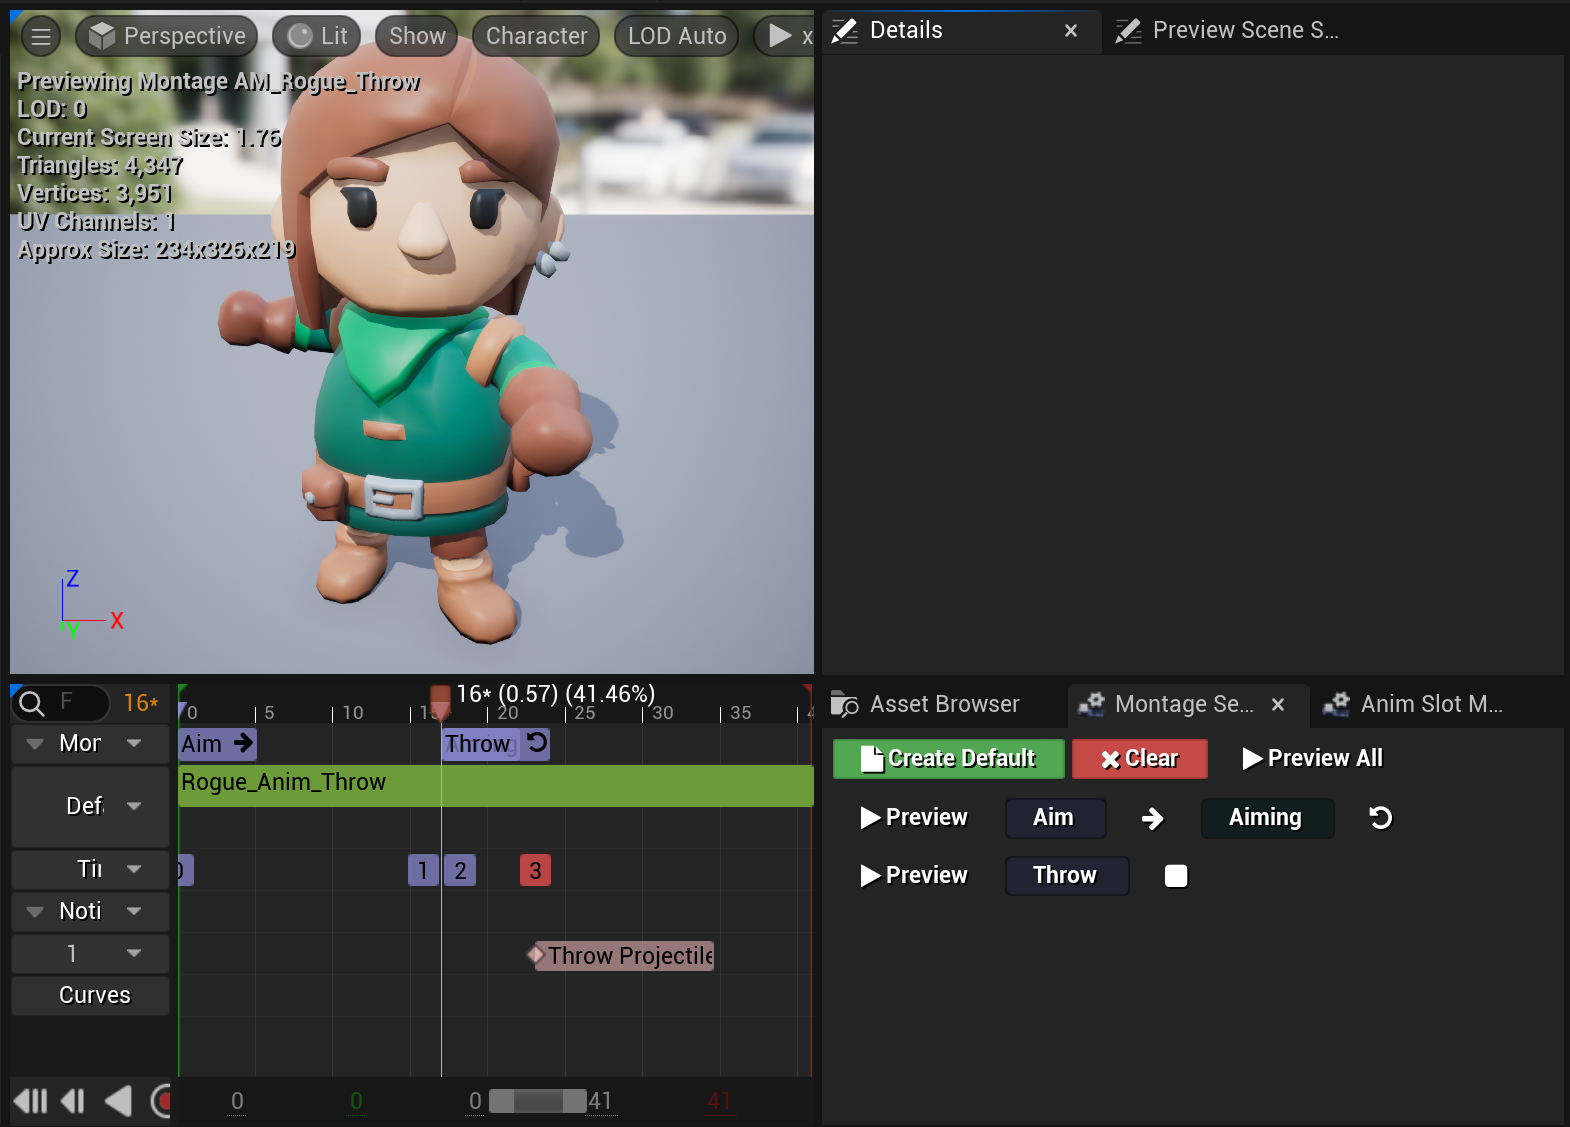
The Aim action triggers an aiming animation and will eventually incorporate a UI overlay to illustrate the projectile's trajectory arc. This action is linked to pressing a designated button. While the button is held down, the player's animation freezes at the final frame of the aim animation, as depicted in the provided montage setup. The UI updates in real-time to reflect the player's movements during this phase. This feature is designed to assist new players by indicating their aiming direction.
In contrast, the Throw action is activated upon releasing the relevant button. Upon release, it plays the Throw segment of the animation montage, triggering an AnimNotify. This setup allows players to launch projectiles immediately by pressing and promptly releasing the button, bypassing the Aim phase entirely. This option caters to experienced players accustomed to projectile trajectories, enabling them to shoot without delay caused by animation playback.
Before going over what this section is about exactly, let's go over the GameItemData class.
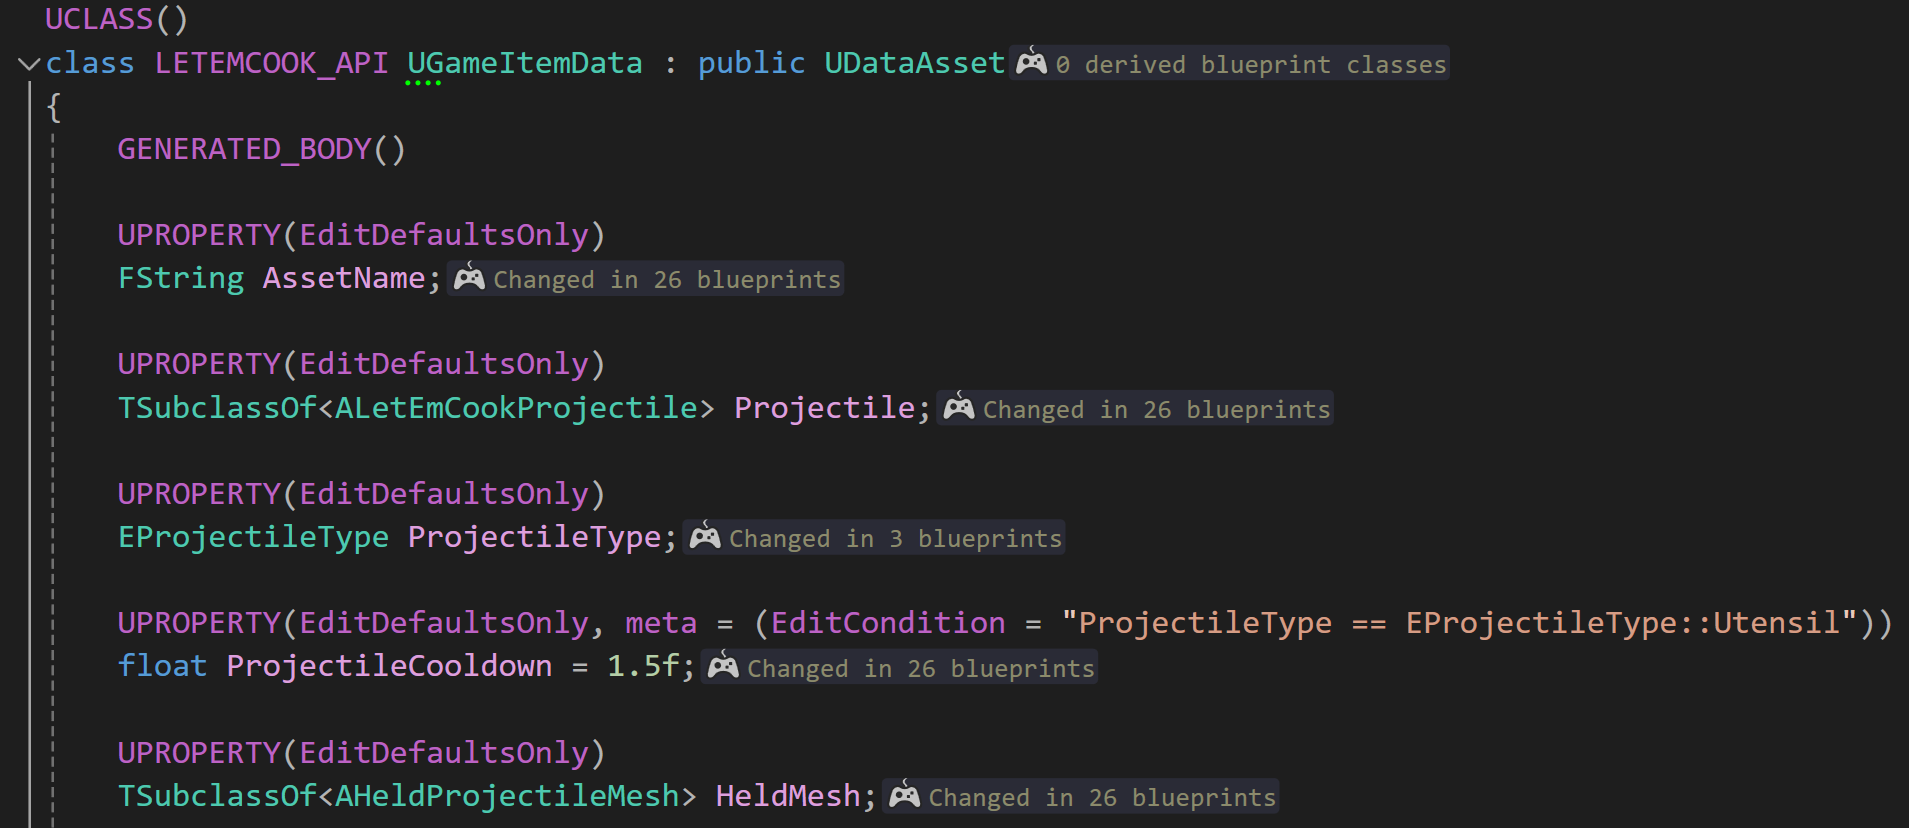
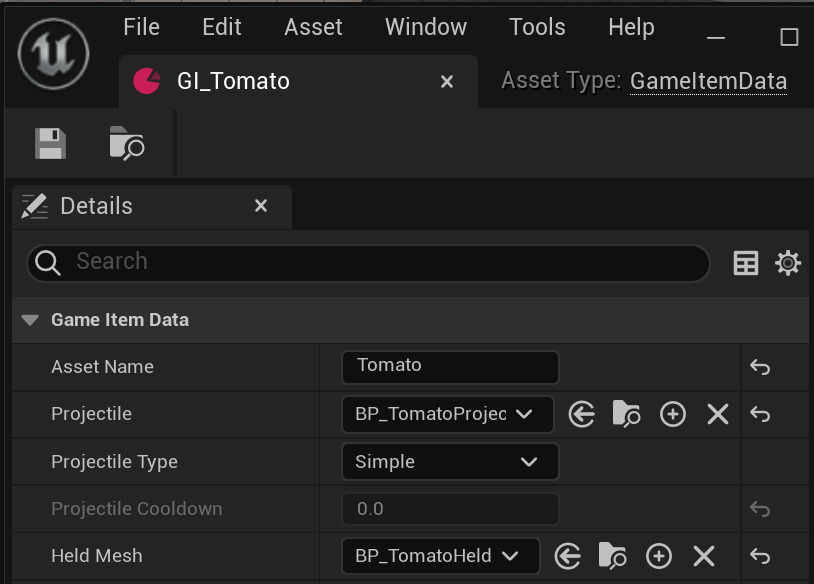
This class is at the heart of our game's asset serialization pipeline. Its pivotal role revolves around storing two crucial pieces of data: the relevant Projectile subclass and the HeldProjectileMesh subclass.
What the heck is the HeldProjectileMesh?
Whenever a player picks up an item, the Character needs to represent holding the item on screen. My initial approach regarding this involved attaching the Projectile's StaticMeshComponent to a custom socket on the Character's skeleton. I tested that with the Knife and everything worked wonderfully. Everyone rejoiced and we achieved world peace. But then everything changed when the Fire Nation attacked I started testing with the Pan mesh.
The reason my system broke down is that the pivots on the assets were not where I needed them to be. The orientations and positions were messy and the StaticMesh was looking funky in the Character's hand. I tried to dig myself out of this hole by vector math-ing to no avail. At last, I gave up and went to sleep.
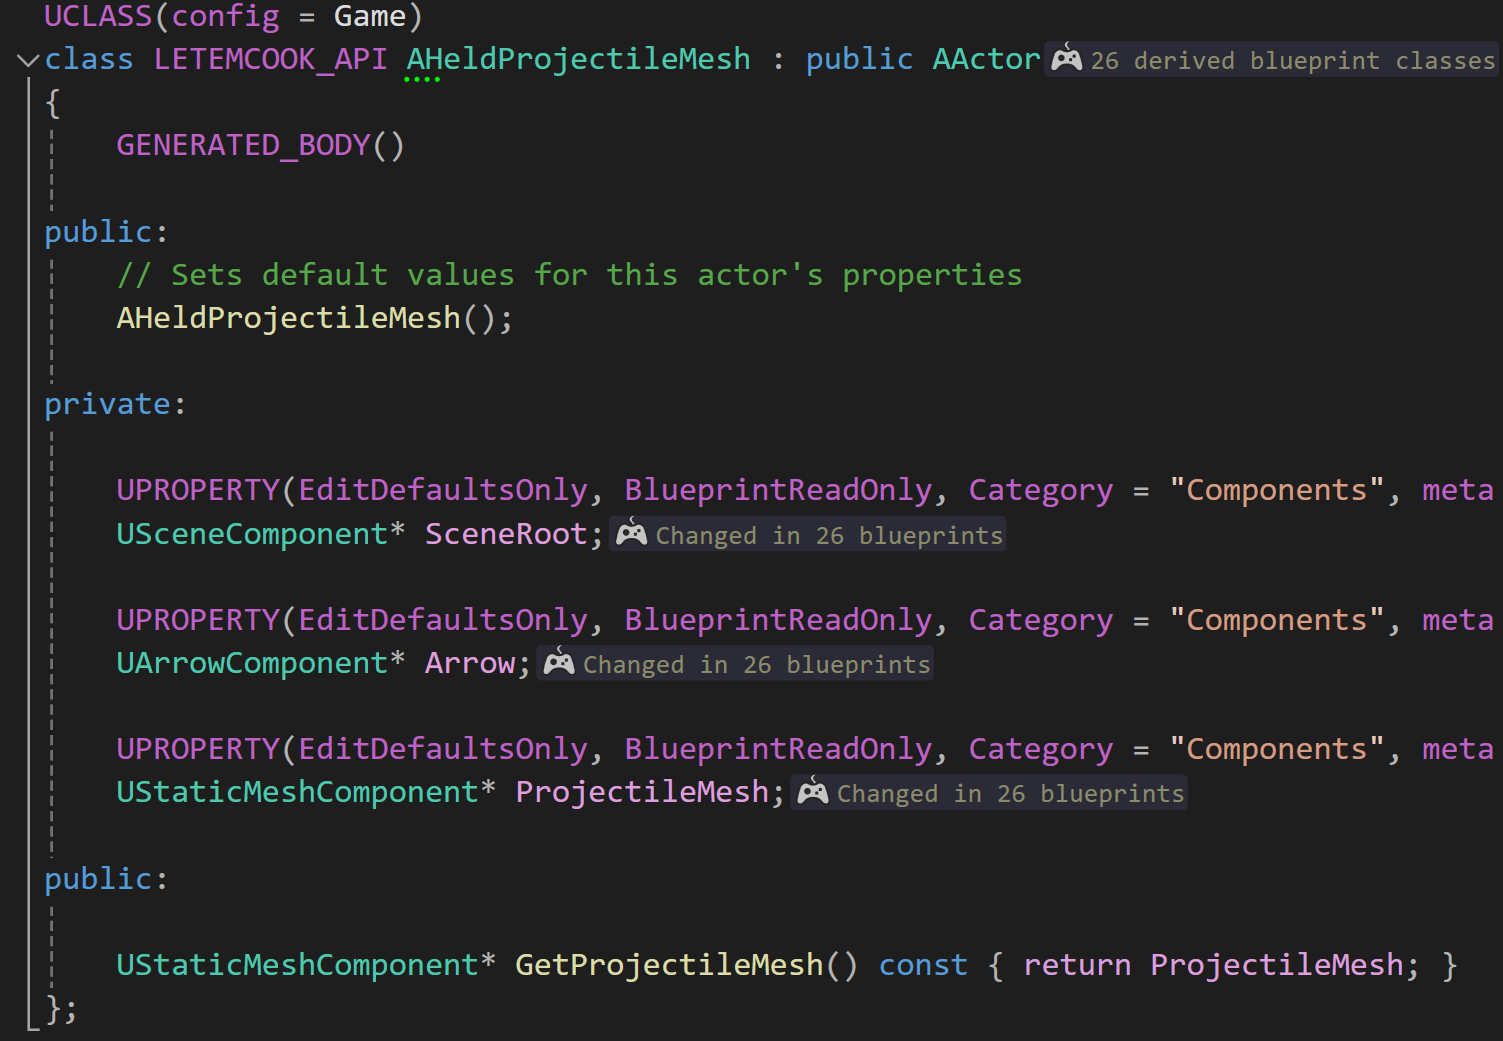
The next day I woke up and decided that I needed something else. And then, the HeldProjectileMesh class was born.
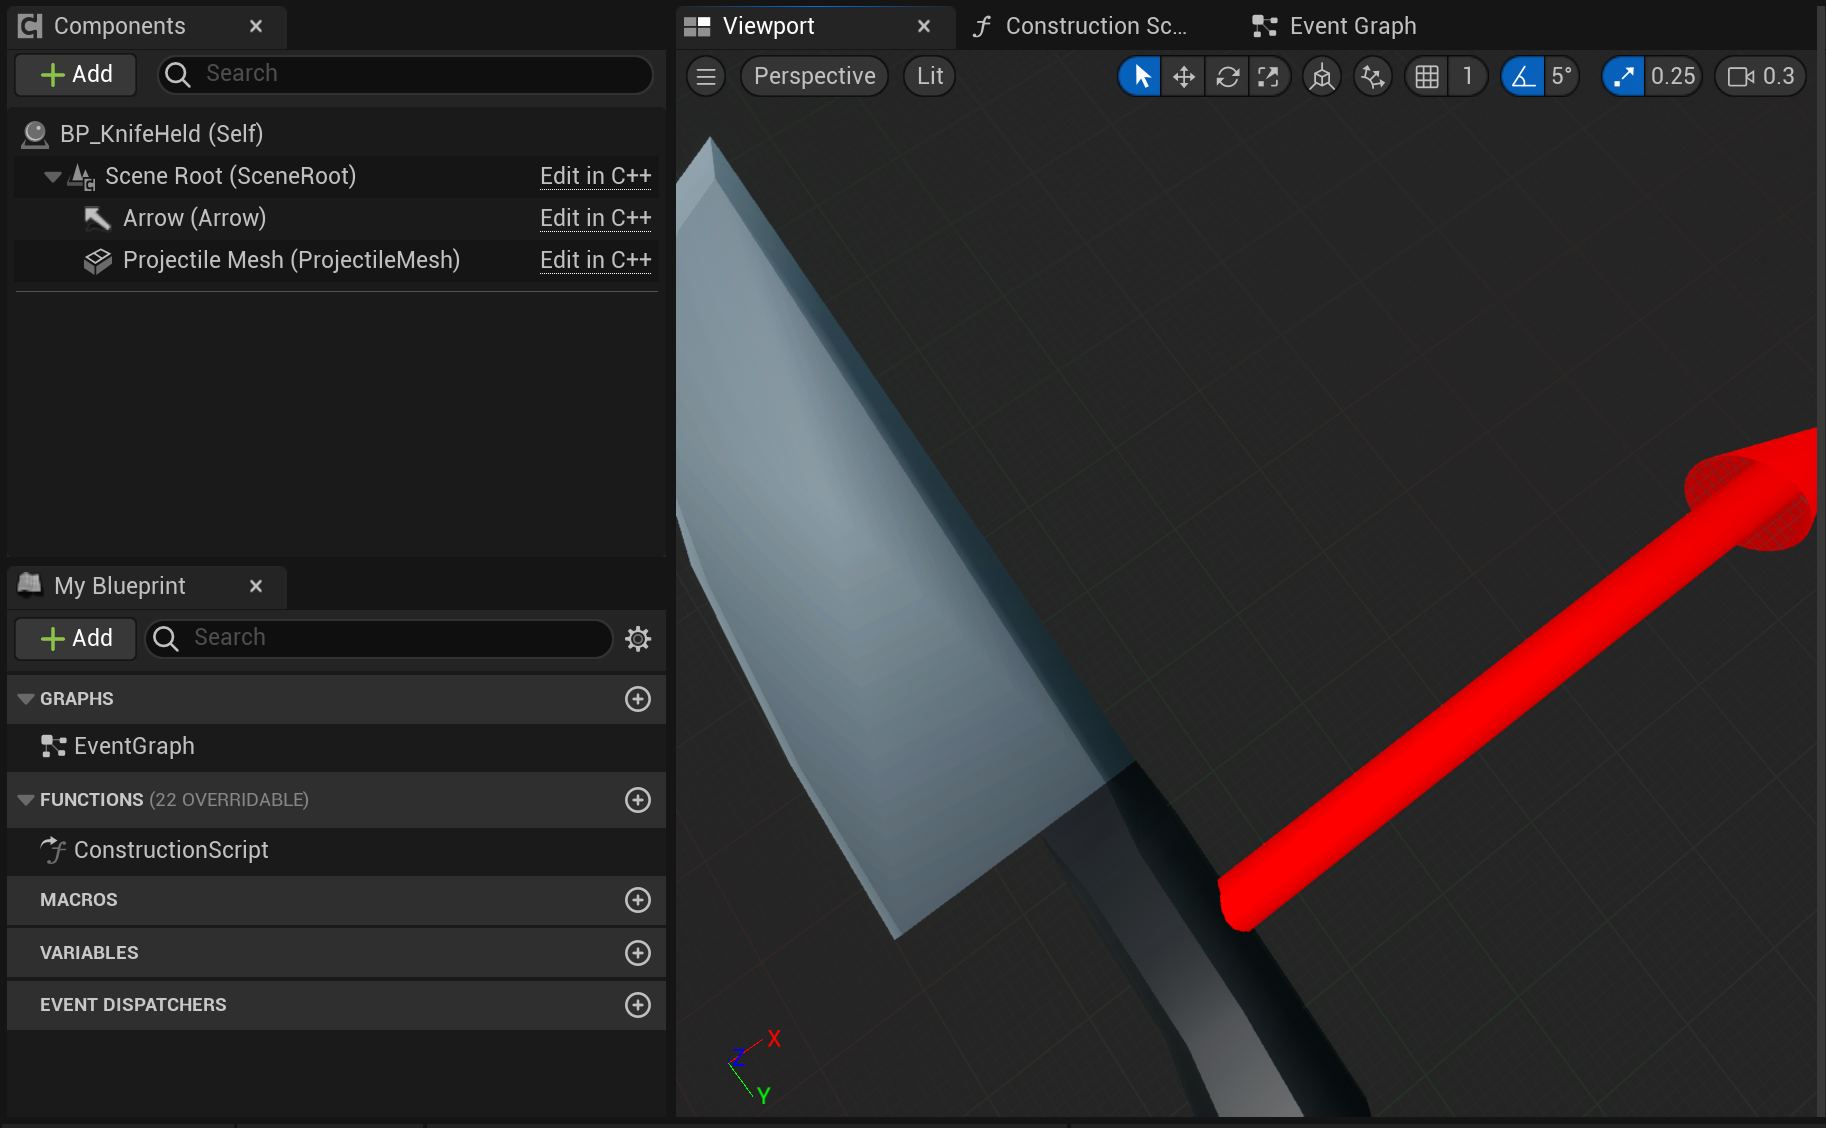
As evident, this class isn't complex. It primarily consists of a Scene Root, defining the pivot, with a StaticMeshComponent attached to it. Additionally, an ArrowComponent provides a visual indication of the character's hand position when the actor is attached to it, for ease of editing of the transformations.
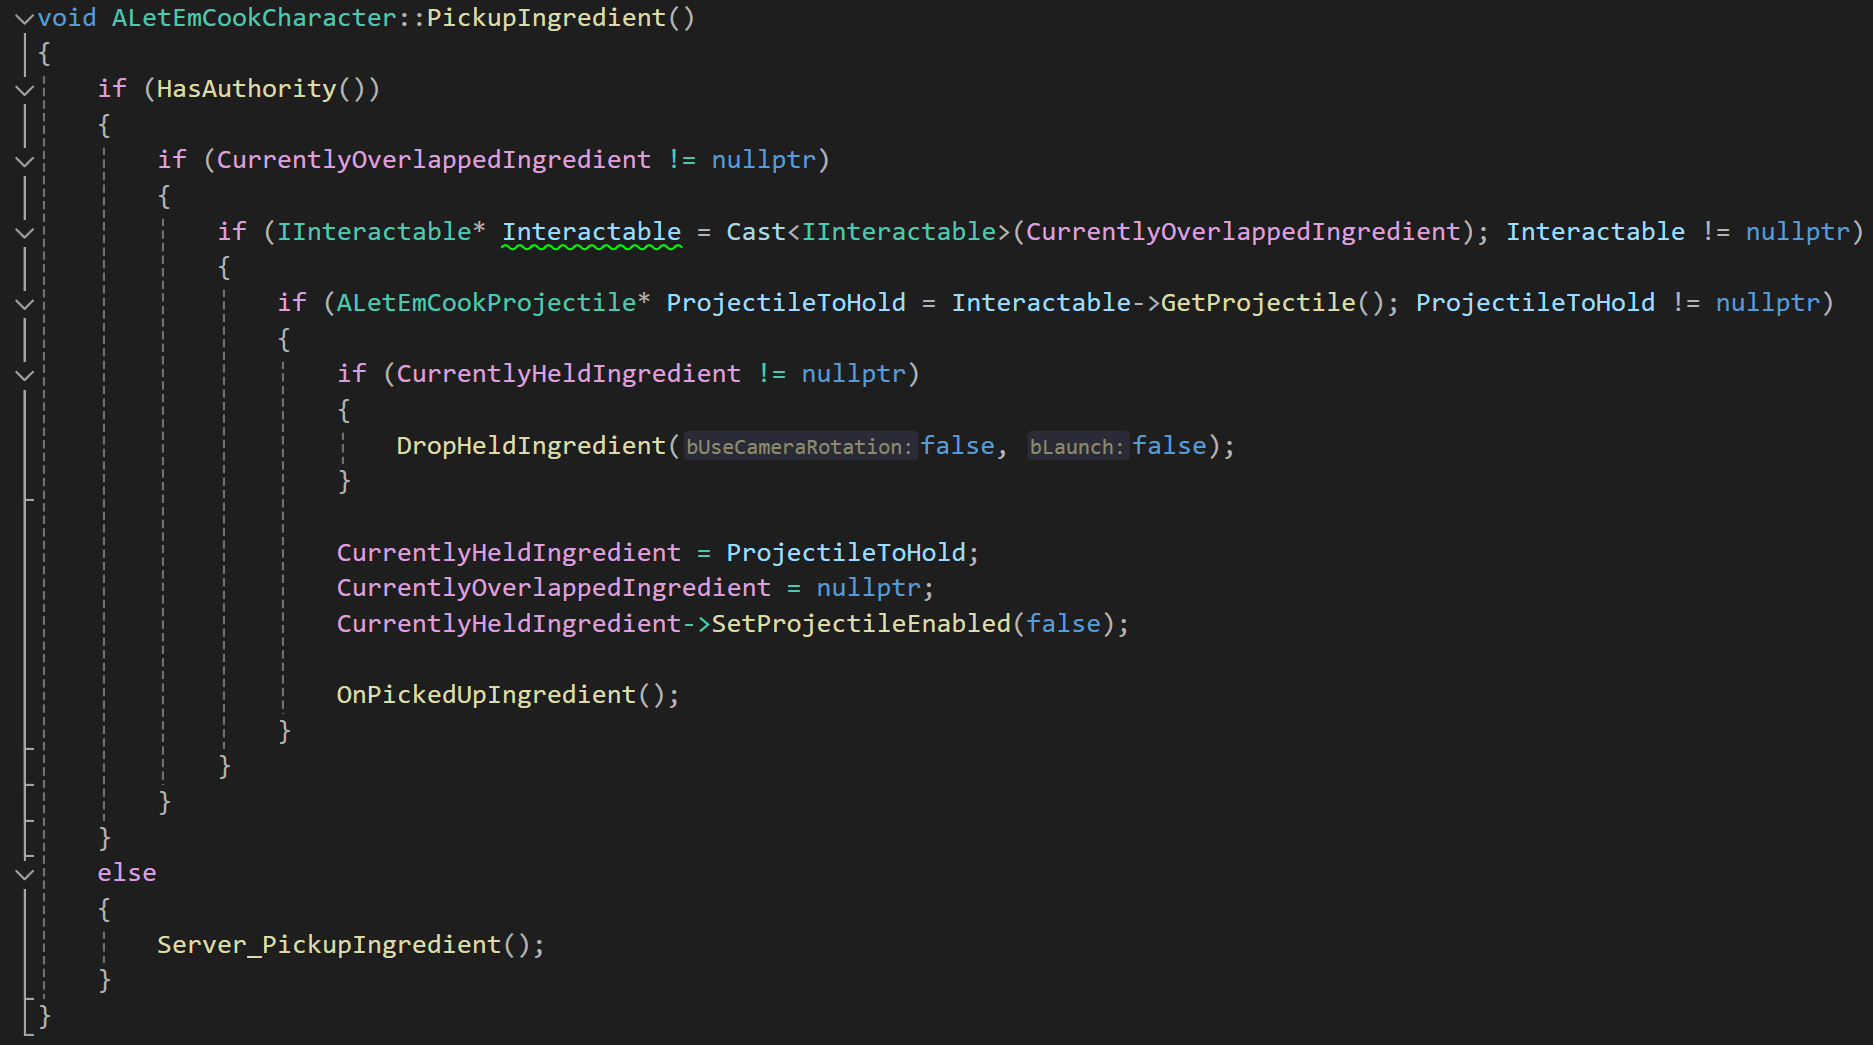
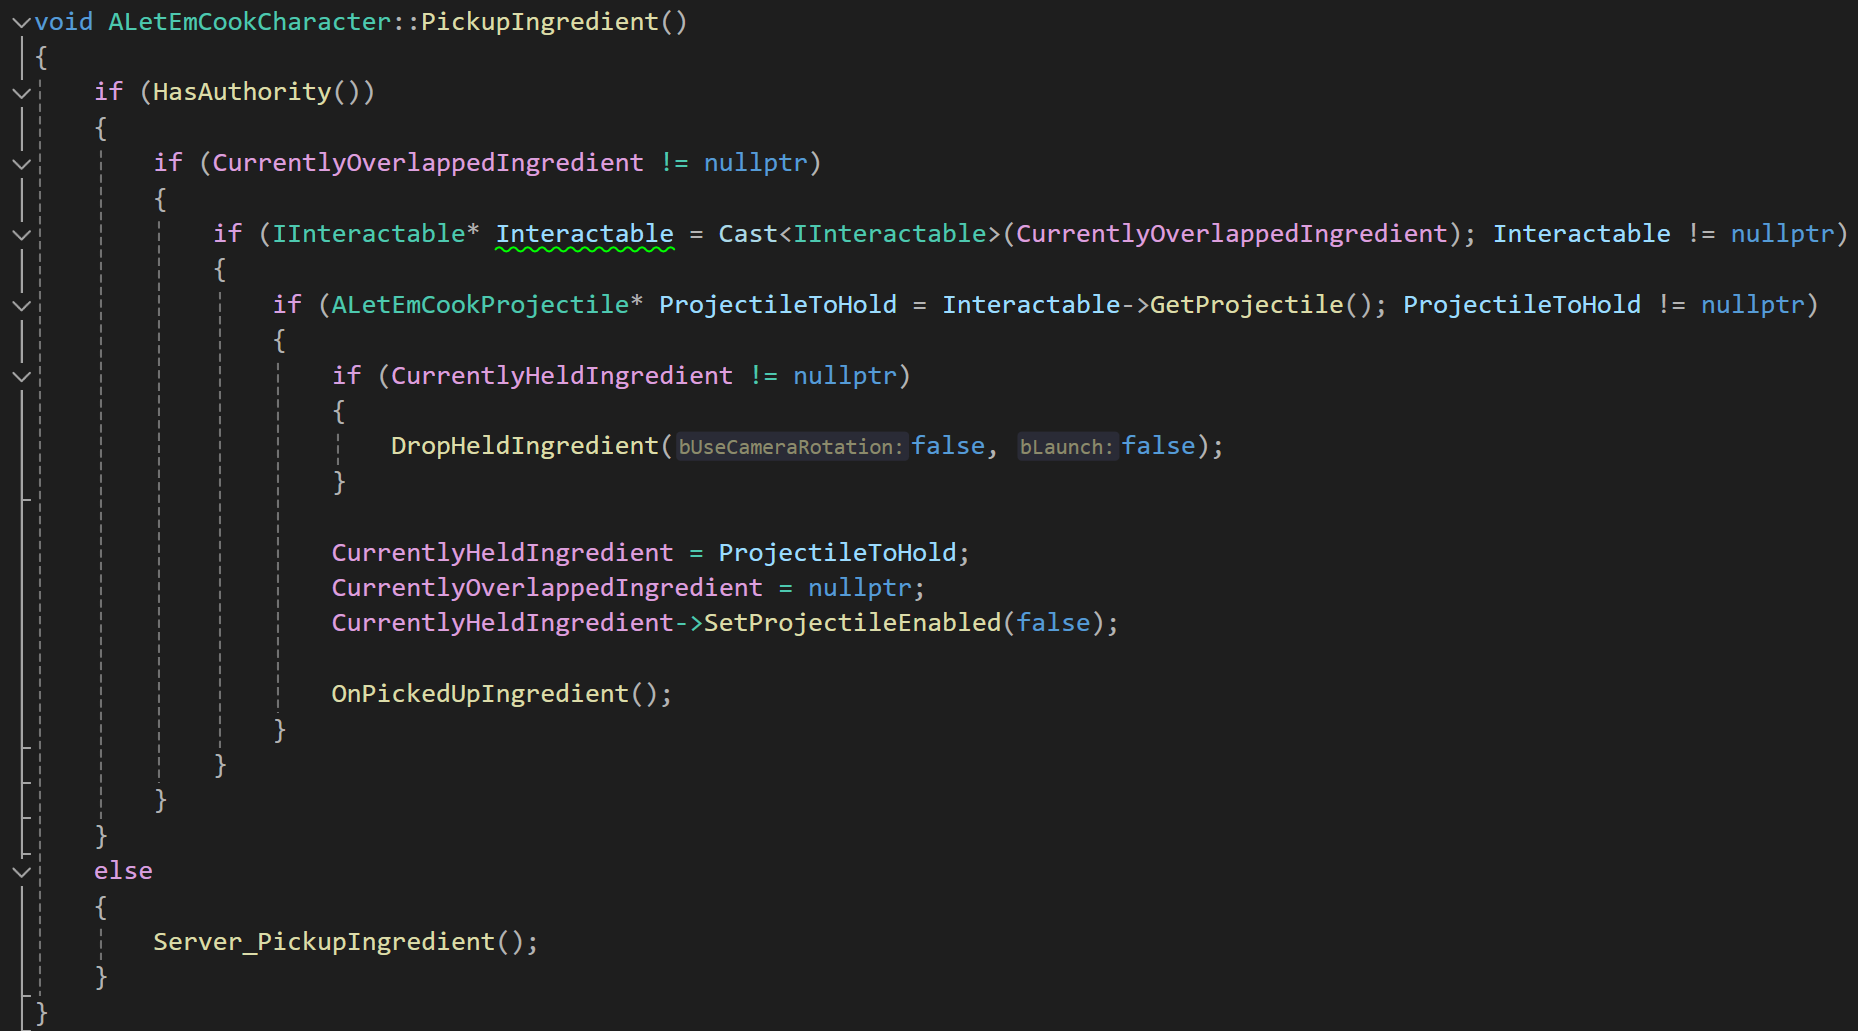
When the PickupIngredient() function is invoked, it first checks if the character has authority, implying that it's controlled by the server. If so, it proceeds to verify if there's an ingredient currently overlapped by the character. Upon finding a valid overlapped ingredient and confirming that it implements the IInteractable interface, the character picks it up.
In the scenario where the character does not possess authority, indicating it's a client, the function routes the action to the server by calling Server_PickupIngredient(). This ensures consistency in gameplay across different instances of the game.
The Server_PickupIngredient() function essentially replicates the pickup action to the server, ensuring that the game state remains synchronized among all players.
Subsequently, after successfully picking up an ingredient, the OnPickedUpIngredient() function is triggered. This function handles the visual representation of the held ingredient, updating the character's representation mesh accordingly. It also manages the visibility of the representation mesh to ensure that the held ingredient is properly displayed in the game environment.
My top priority for this week was configuring Perforce for the project. Drawing from my past experience with Perforce at Streamline Studios, I recognized its effectiveness in preventing conflicts and ensuring team members didn't inadvertently overwrite each other's work, ultimately safeguarding the project's integrity.
This turned out to not be an option in our case because we do not have the resources required to set up the necessary infrastructure for this. The next step was to start scouring the internet for alternate solutions. I tried using Git for the Revision Control pipeline within Unreal, but it does not support features such as locking assets for when someone is working on them.
After some more searching, I came across the UEGitPlugin, which appeared to be a step up from the basic Git pipeline for Revision Control. However, despite its advantages, it lacked the capability to lock assets. After discussing with my team, we concluded that for the time being, manually coordinating and communicating with each other while working on the project would suffice.
Moving onwards, I started working on the Collision system for our Projectiles. I created an OnHit() function which I bound to the OnActorHit delegate of the Projectile.
Then I started testing and voila! Nothing happened…
After looking around a little I realised the problem was that my Projectiles were not simulating physics. Well, that was an easy fix. Right?
Turns out simulating physics while trying to make that work with the ProjectileMovementComponent is a nightmare. So, I did what any self-respecting developer would do, I started writing my own movement pipeline.
Now that sounds more impressive than it is, because I decided to simply leverage Unreal’s physics system for my needs.
A simple AddImpulseToProjectile() function later, we were finally up and running with our Collisions!
For the interactions, I wanted to create an event-based setup for centralised collision management. Essentially, whenever a throwable collides with another, it sends the collision data to the GameMode instance. The GameMode then adds this information to a queue, which it processes in the next frame update.
The GameMode has an array of valid interactions. For example, if a knife hits a tomato we should get cut tomatoes, but nothing should happen if a knife were to hit a pot.
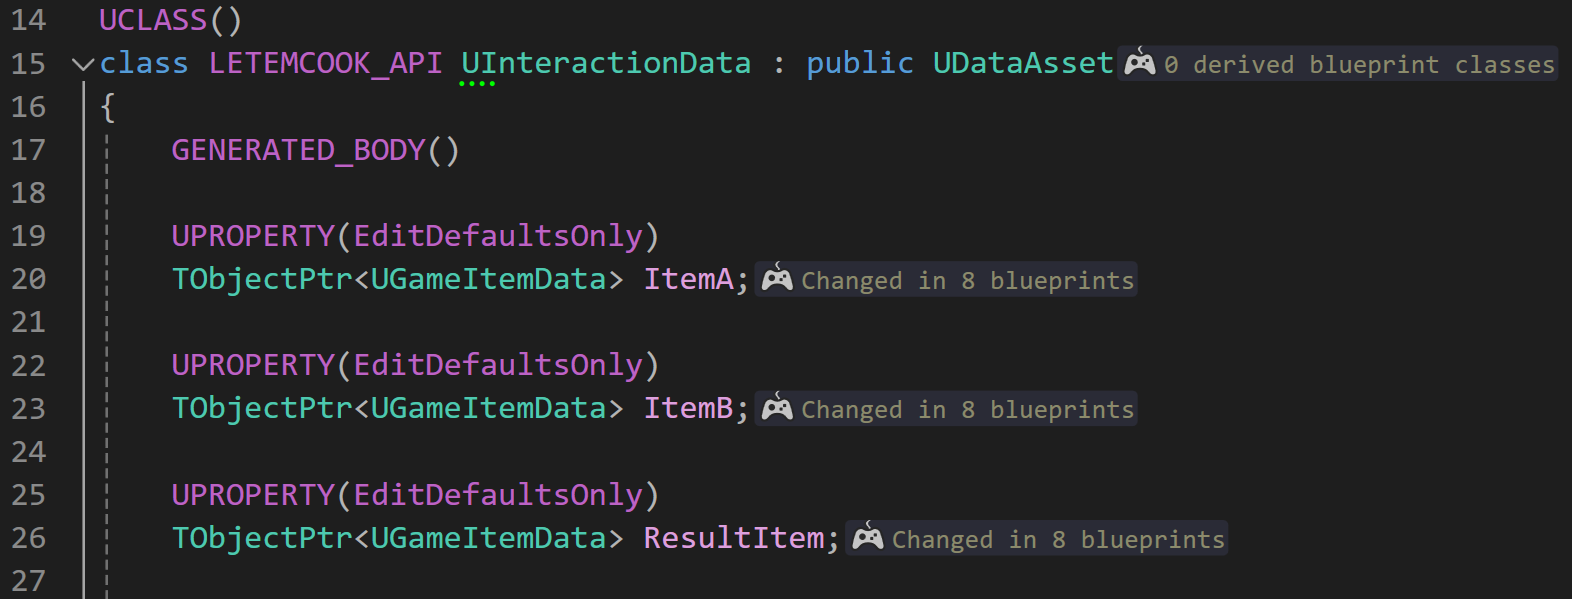
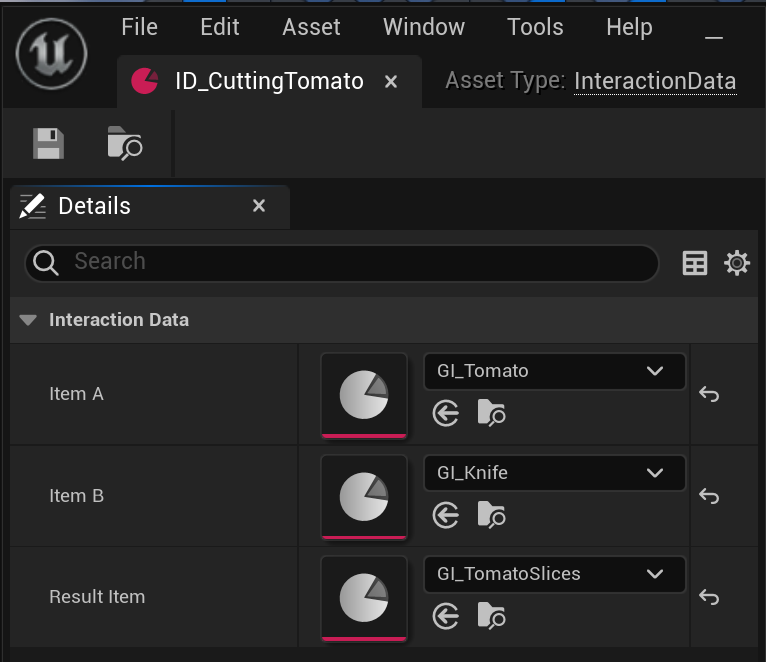
The UInteractionData class is a simple DataAsset that holds the pertinent data for the interactions. We simply select the two objects that interact and the resulting item, and voila, the GameMode handles the rest for us.
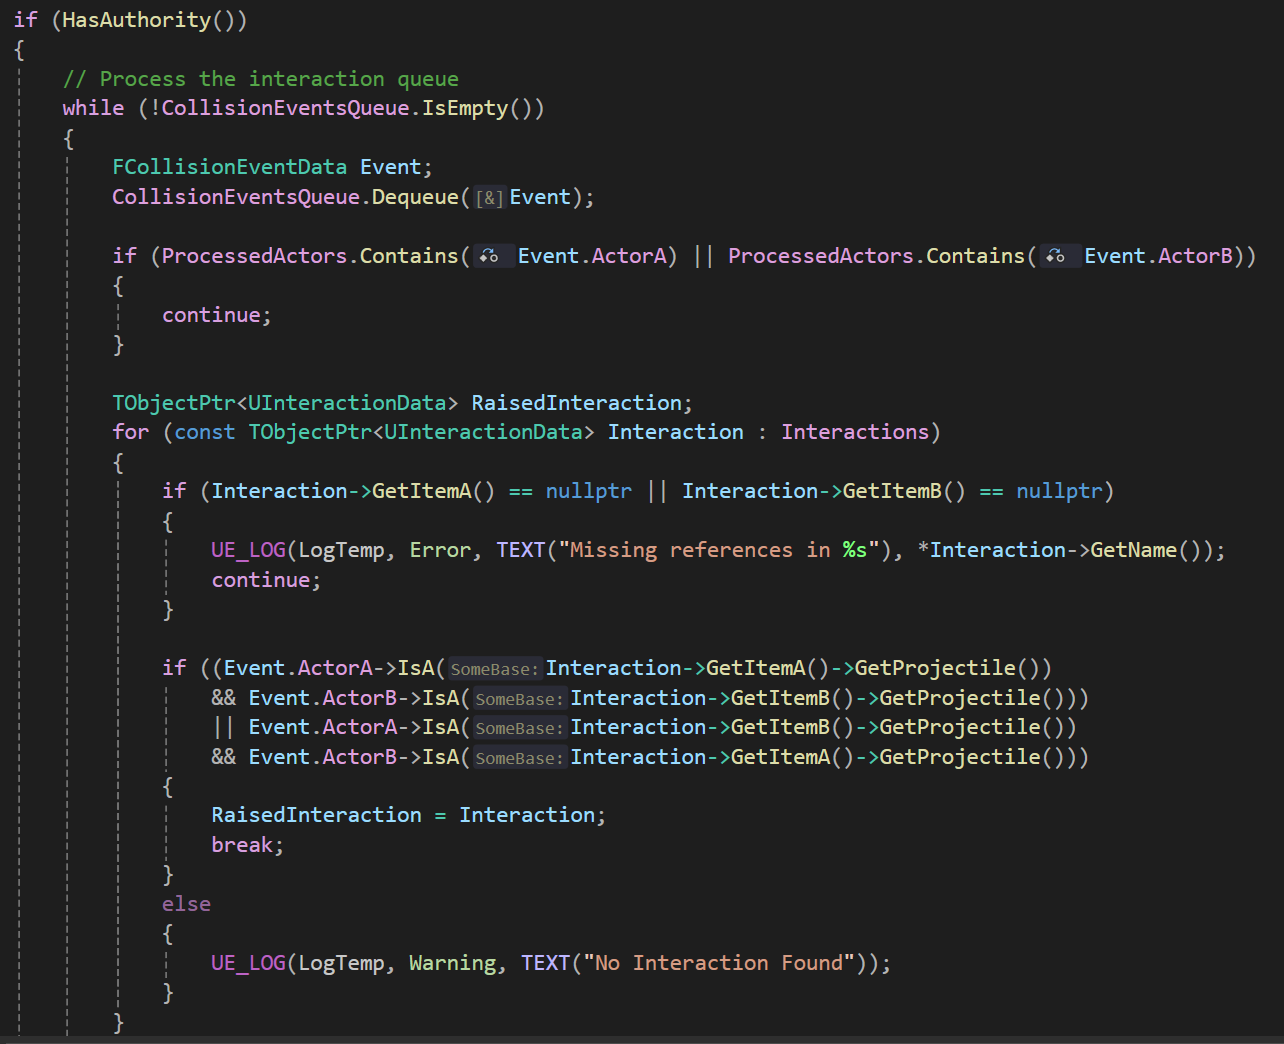
This is the code for the collision handling. Firstly, we make sure that we are the server. Then, we loop over the CollisionEventsQueue to make sure we have processed every interaction. The ProcessedActors is a set of AActors that keeps track of the actors whose interactions we have processed so far. This is because when object A and B collide, they both sent the collision event to be queued by the GameMode. Adding it to the set makes sure we process said interaction only once.
We then go over the interactions possible, checking each till we find the relevant interaction.
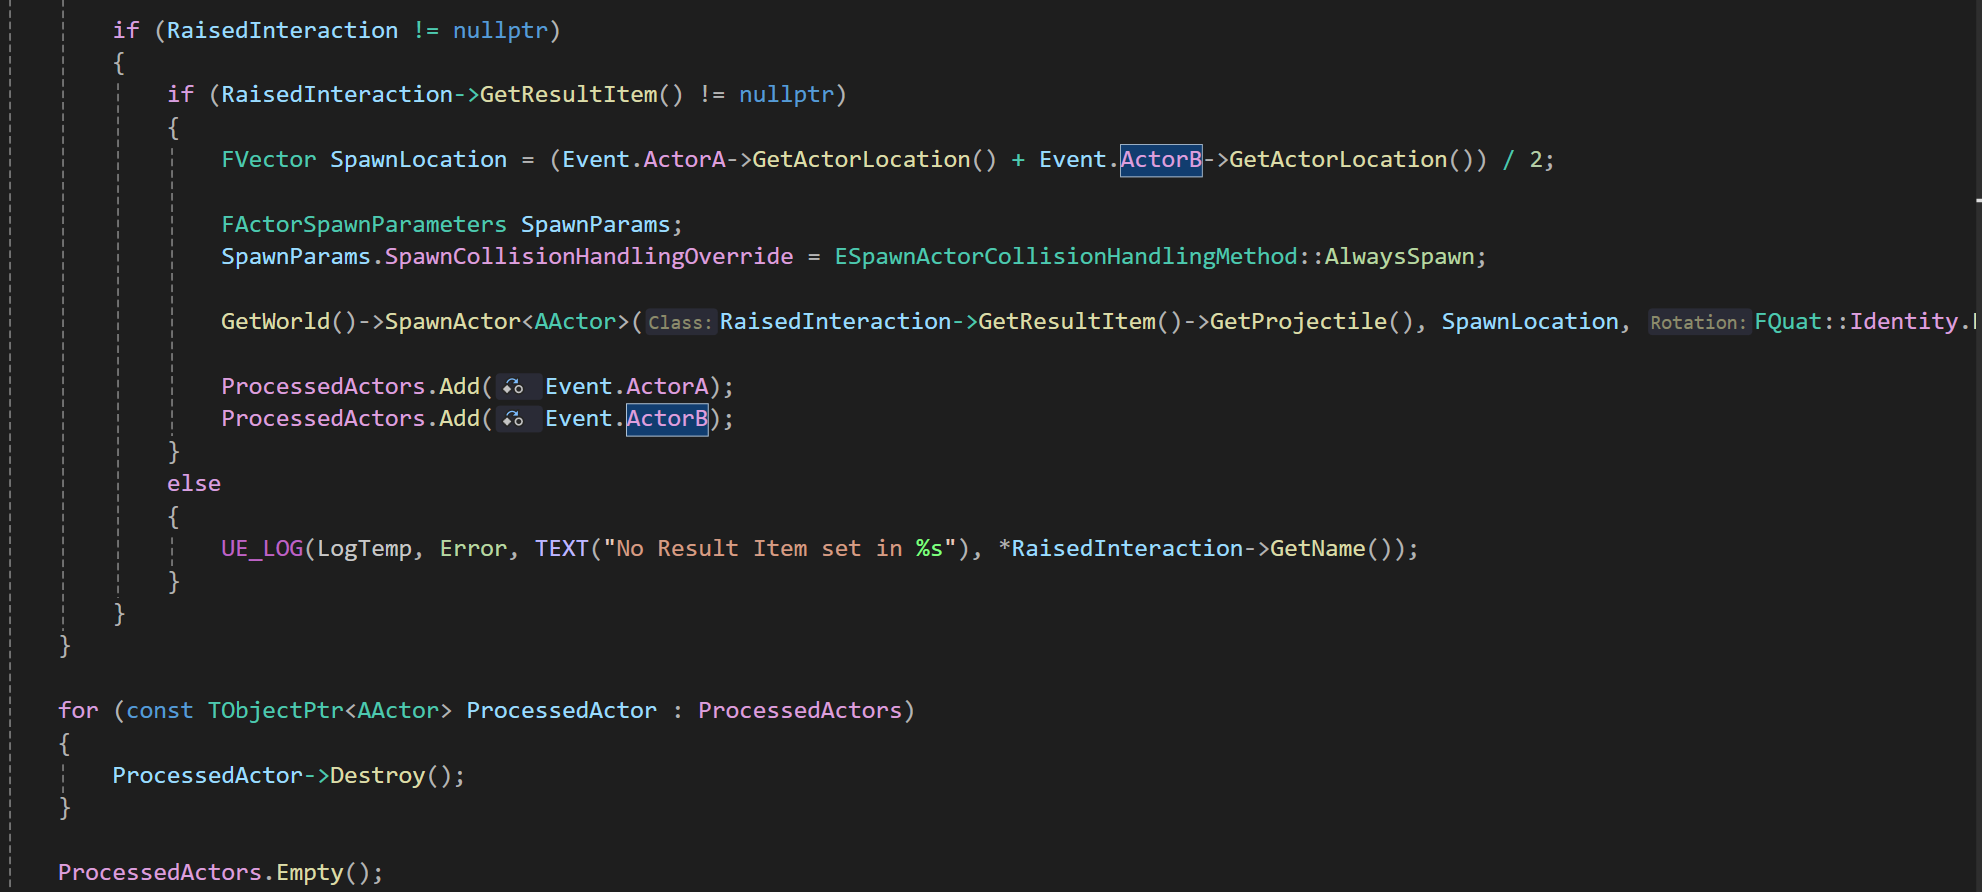
Once we have the interaction, we instantiate the ResultItem actor and add the colliding actors to the ProcessedActors set. Then, we simply iterate over the set, destroying each actor as we go. Finally, we empty the set so that it’s fresh and ready for the future.
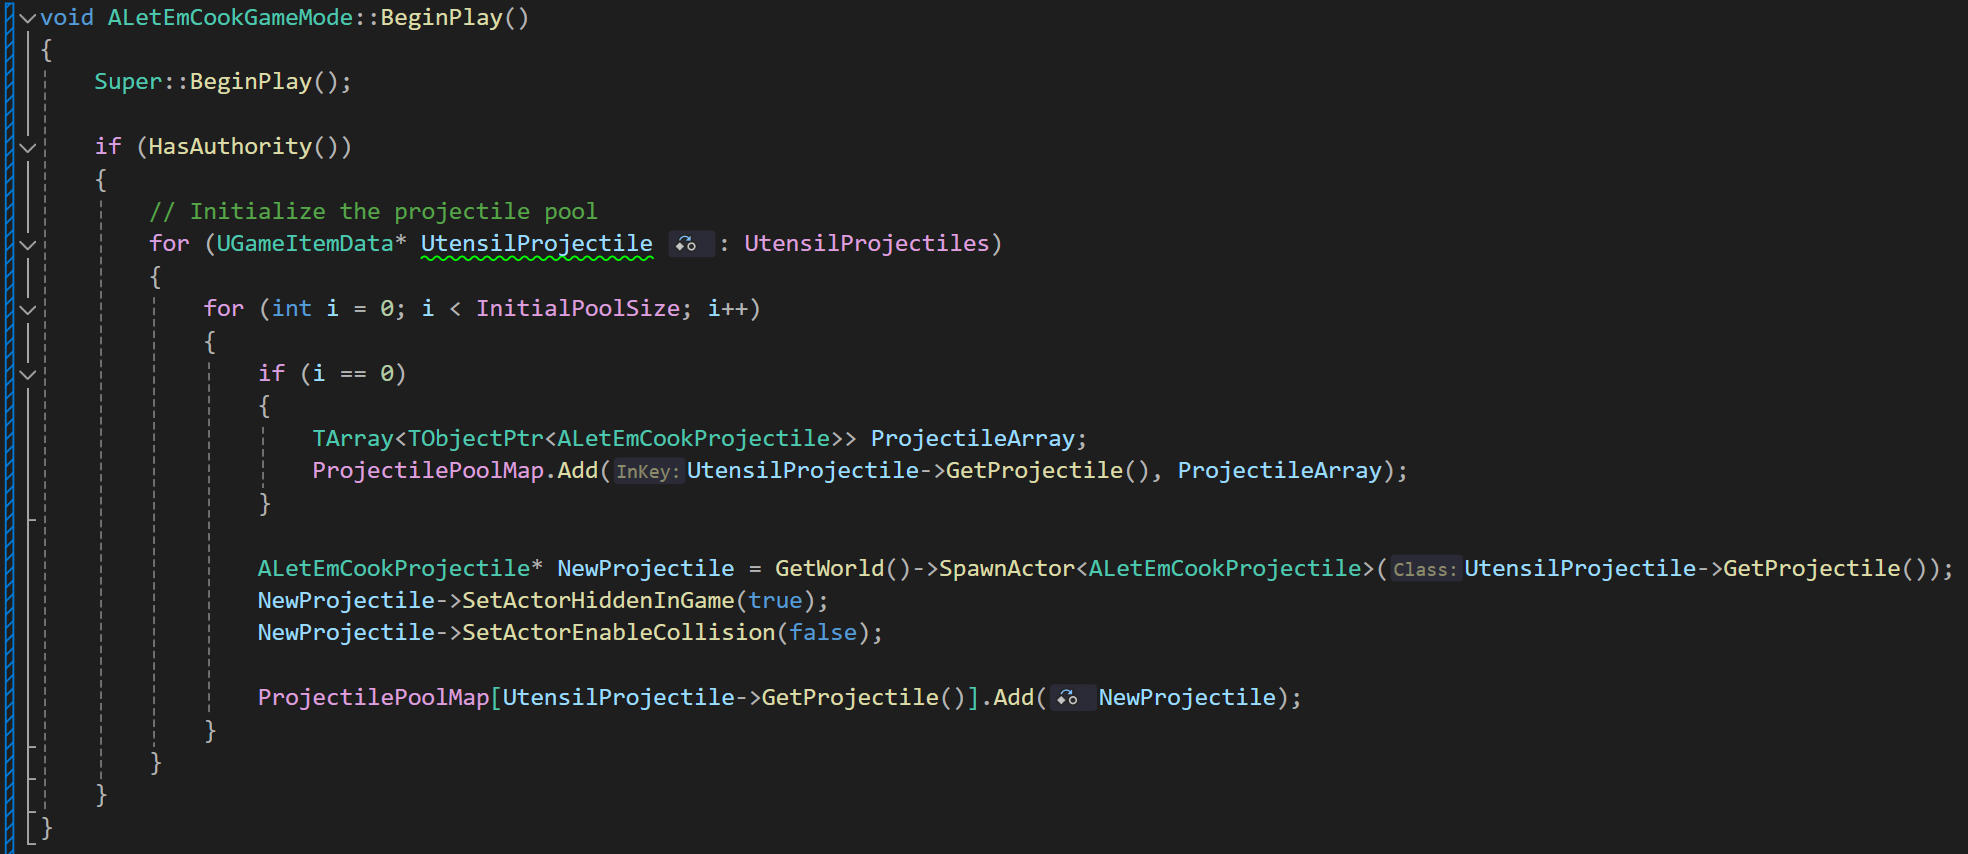
A much more elegant solution would be to use an object pool instead of all the instantiation and destruction. To facilitate the same, I created the following setup.
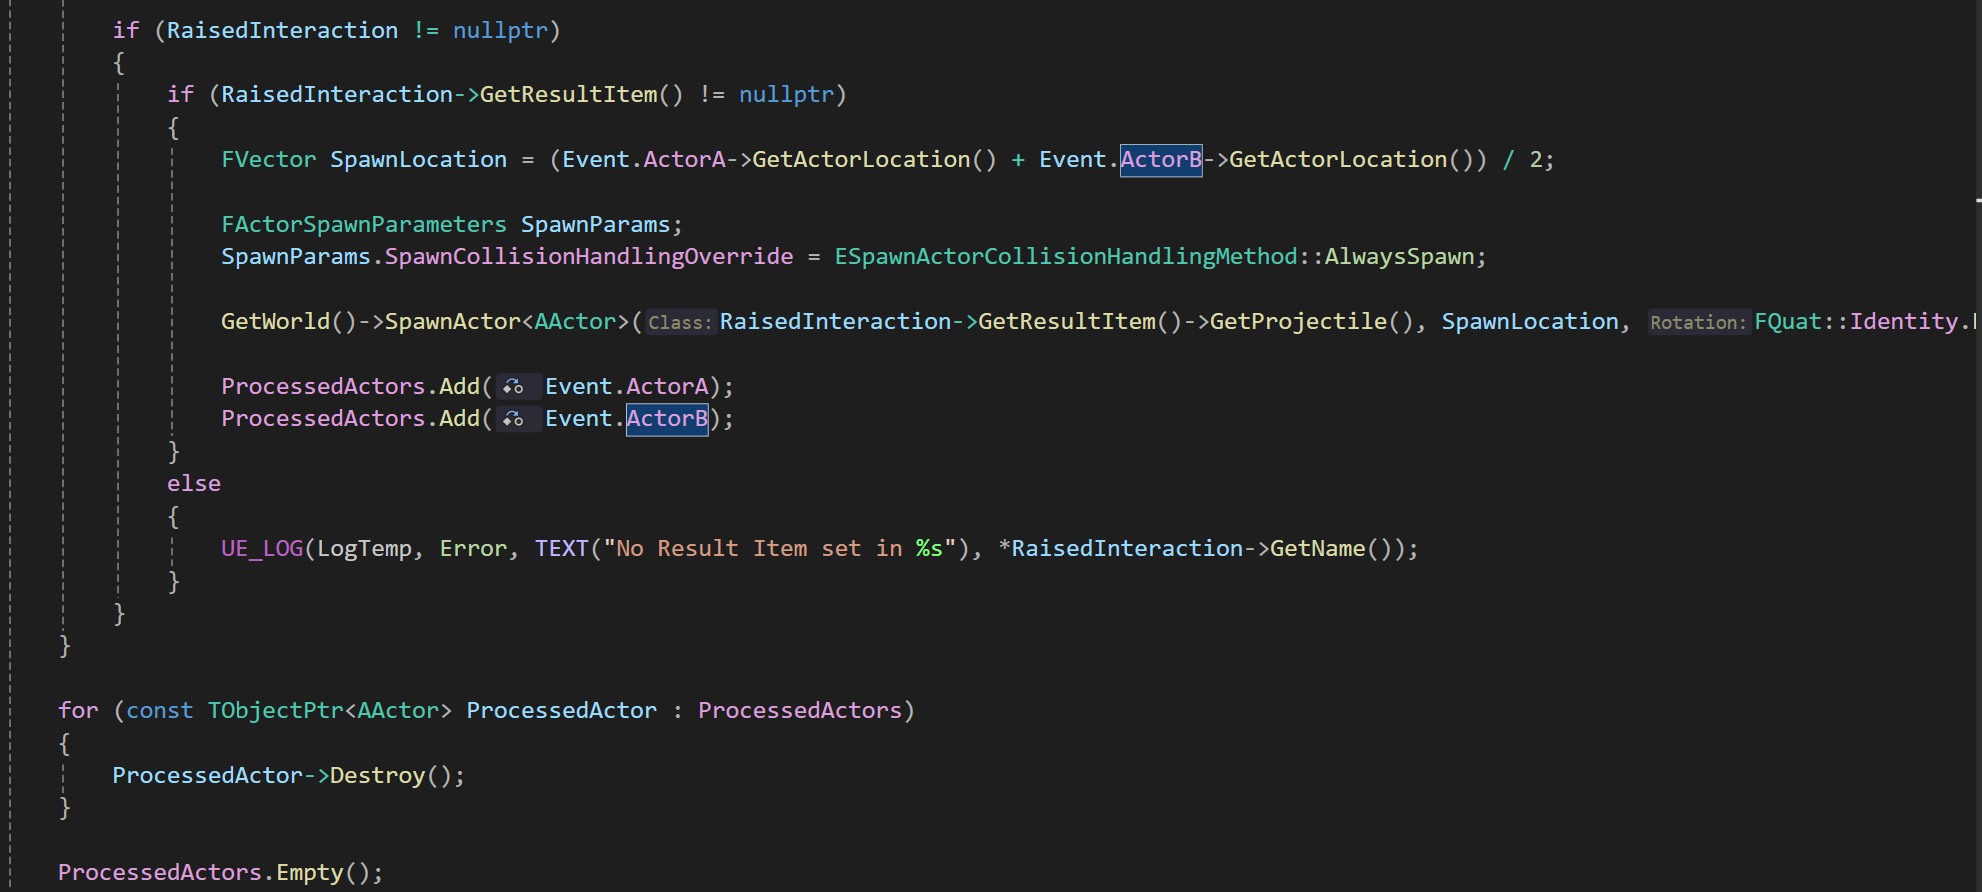
After implementing the necessary adjustments in the Character class, the game began crashing. Consequently, I decided to temporarily comment out this code to revert to a stable state, prioritizing the establishment of core systems before delving into optimization concerns.
This has also given me some time to think about the object pool architecture. It's apparent that having all these items constantly replicated across the network isn't the most bandwidth-efficient approach. A more efficient setup would involve replicating them only when required. Additionally, I'm contemplating implementing a custom pipeline to update the transform of projectiles in the future. This adjustment would accommodate lag and ensure smoother movement on client machines. Thankfully, as a result of this I have a clearer goalpost to aim for when I finally get around to start optimising the systems.
Rather than having to pick up Utensils such as the Knife, Pot and Pan we have decided that they will automatically appear in the Character’s hands after a cooldown period. This is because even though we want our gameplay experience to be highly chaotic, there is still a balance to be struck there.
We're currently having players pick up ingredients from a pantry, and adding the need to rush around for utensils felt excessive, especially considering they're the only means of dealing damage to opponents. Picture a scenario where you've just thrown your last utensil and missed, while your opponent still has theirs. Now, you're forced to disengage while your opponent tries to attack you. We determined it would be more satisfying if players could stand their ground, strategize, and evade their opponent's attacks while waiting for utensils to respawn, enabling them to retaliate effectively.
To implement this functionality, I began by adding a map into the Character class. This map is utilized to monitor the timings associated with each Utensil Projectile.
Next, I initialise the map using our array of Projectiles.
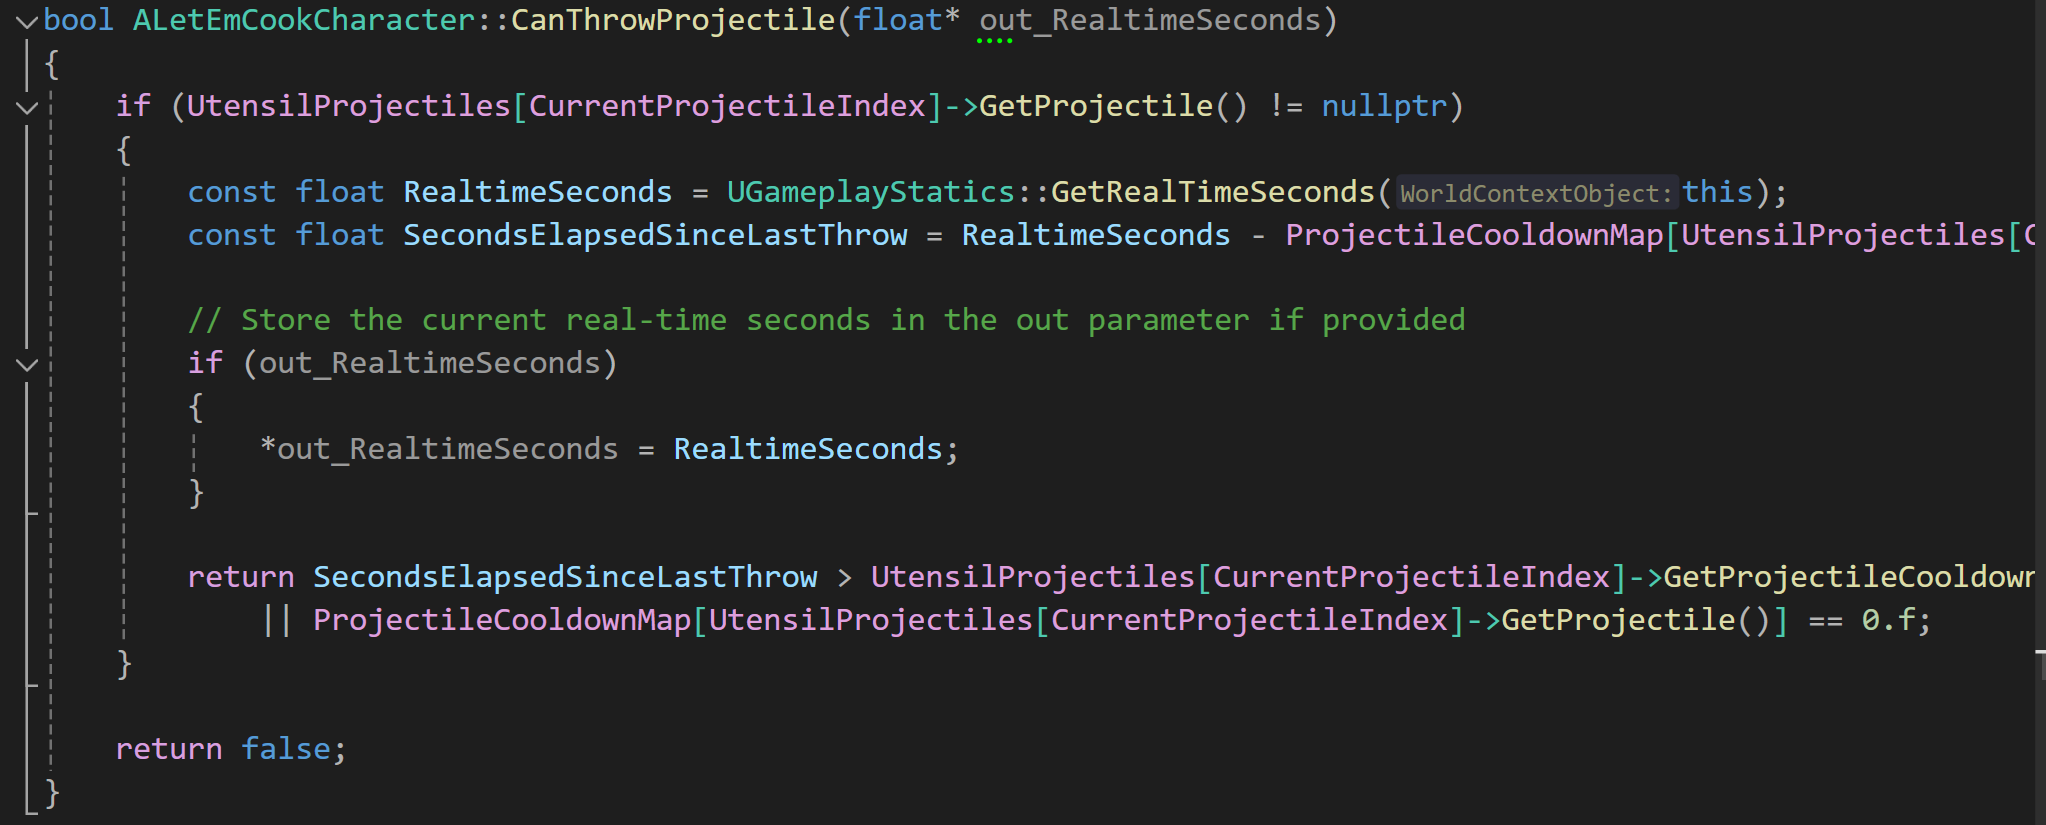
Following that, I introduced a CanThrowProjectile() function which returns a Boolean value indicating whether the projectile is ready for throwing. Additionally, it includes an optional Out parameter to retrieve the current time.
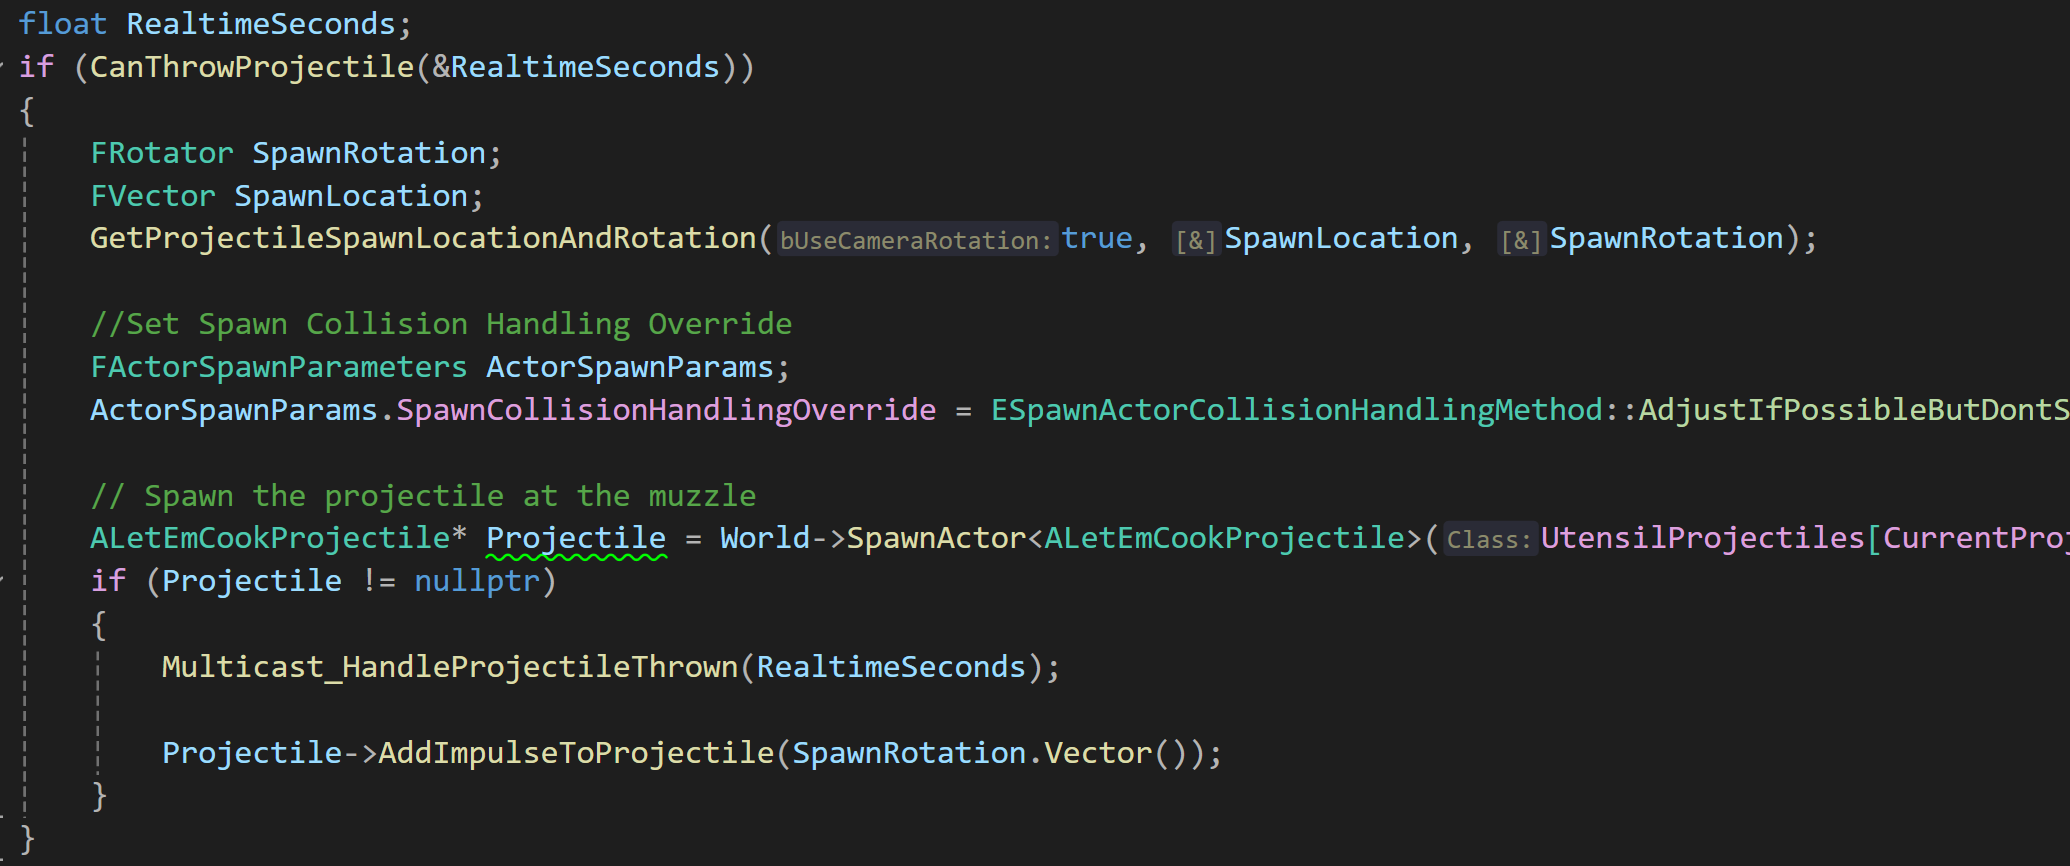
I implemented a check within the LaunchProjectile() function to to make sure we can in fact throw the projectile before its instantiation. Subsequently, the Multicast_HandleProjectileThrown() function is invoked to update the ProjectileCooldownMap and conceal the corresponding HeldProjectileMesh. This action serves as a visual indicator to all players that the projectile is presently unavailable.
Another week, another blog. With the Projectile system now established, it was time to proceed with implementing the item pickup functionality.
I began my implementation by adding an AActor variable and an ALetEmCookProjectile variable, both Replicated to be in-sync across the network.
Next, I devised a straightforward function responsible for assigning the CurrentlyOverlappedIngredient. This function is invoked by the Character's Tick function, which conducts a Raycast every frame to detect nearby viable actors.
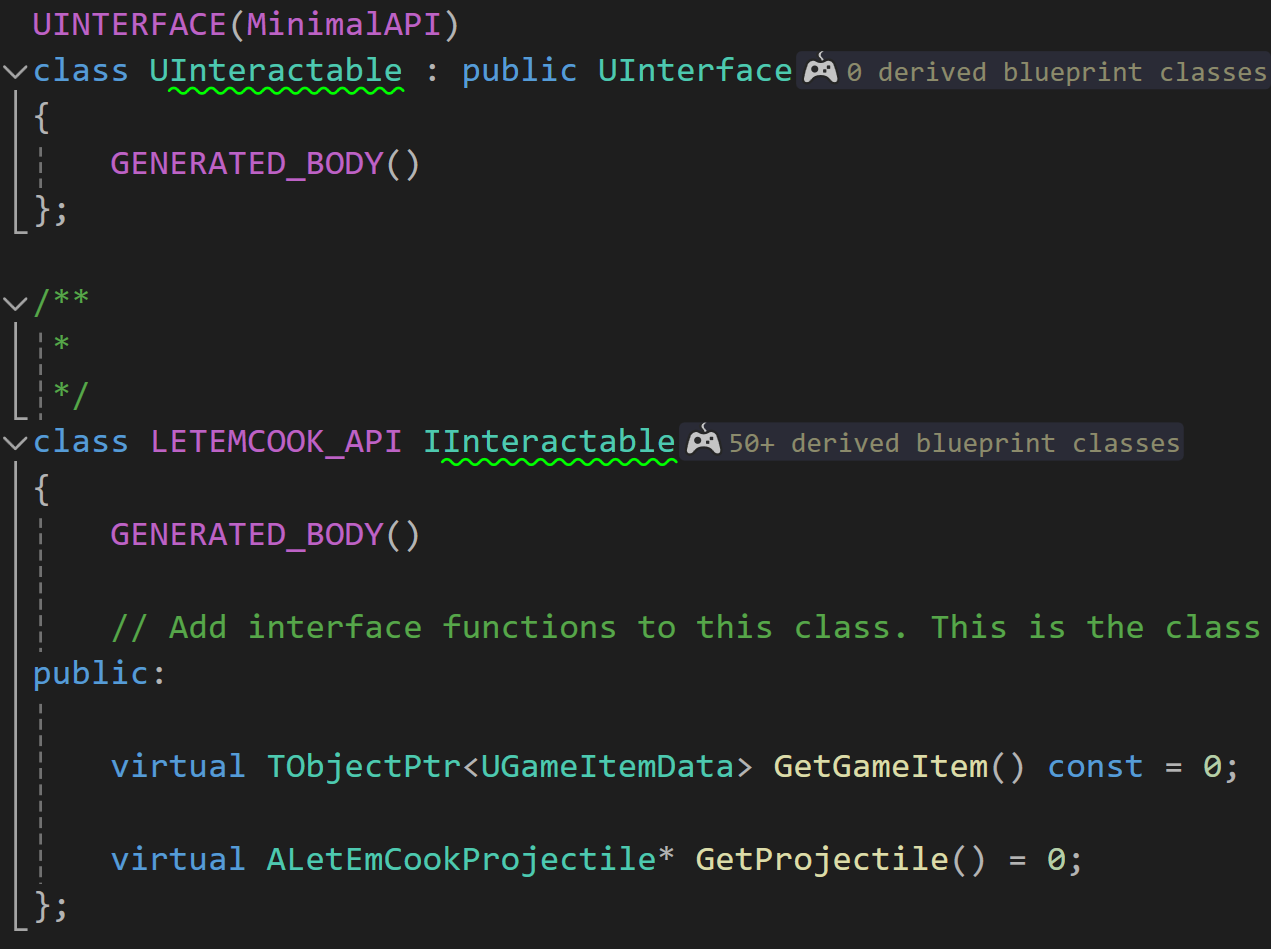
This is also the part where I finally created the first interface. It is quite simple and just has two getter functions, one for the relevant GameItemData, and one for the Projectile.
Initially, the Projectile getter may appear redundant, especially within the Projectile class where it merely returns itself. However, its inclusion is strategic, anticipating future requirements in the game's Pantry area. This area will feature Containers from which Ingredients can be retrieved, and these Containers will return the appropriate Projectile. This setup streamlines the process for any class to implement this interface, facilitating easy projectile pick-up.
The PickupIngredient() function is assigned to the Pickup action. It checks to see if we already have a CurrentlyHeldIngredient and if so, drops it. Then it picks up the new ingredient.
Since we set the meta specifier 'ReplicatedUsing = OnPickedUpIngredient' for the CurrentlyHeldIngredient, it is called automatically on the Clients when we change the value of CurrentlyHeldIngredient. However, for the server we need to call it manually, which is taken care of within the PickupIngredient().
In addition to the updates outlined below, I addressed several bugs this week. I have omitted going over them because I didn’t want to bog down the blog with said details, and also because I forgot to document most of that because I was too preoccupied getting the actual fix in place.
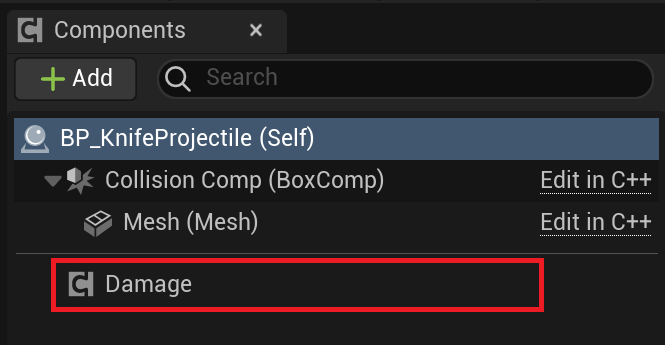
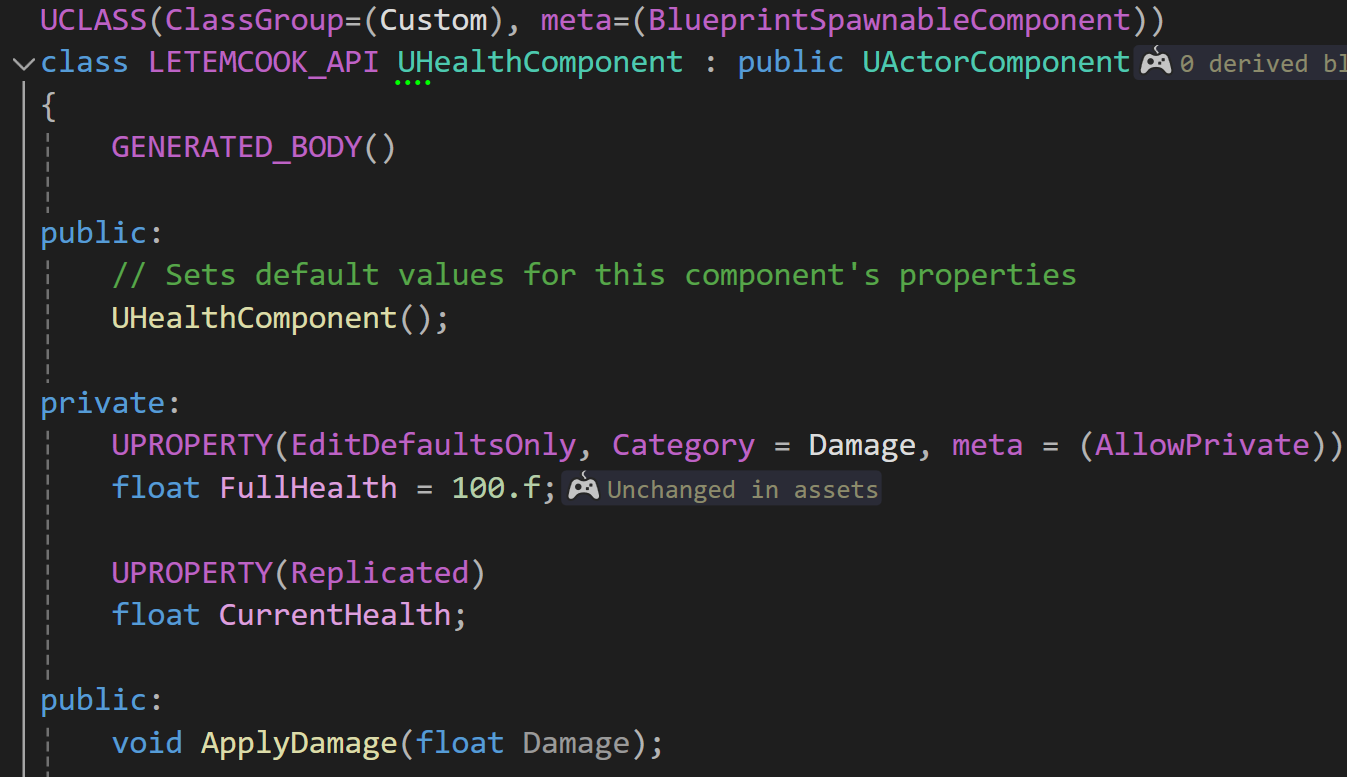
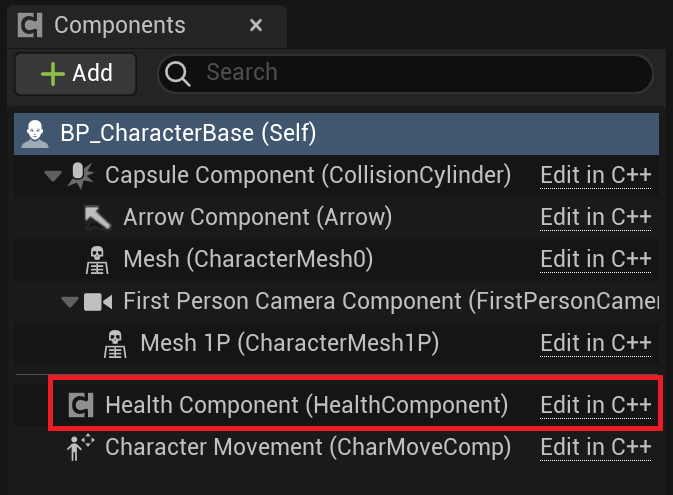
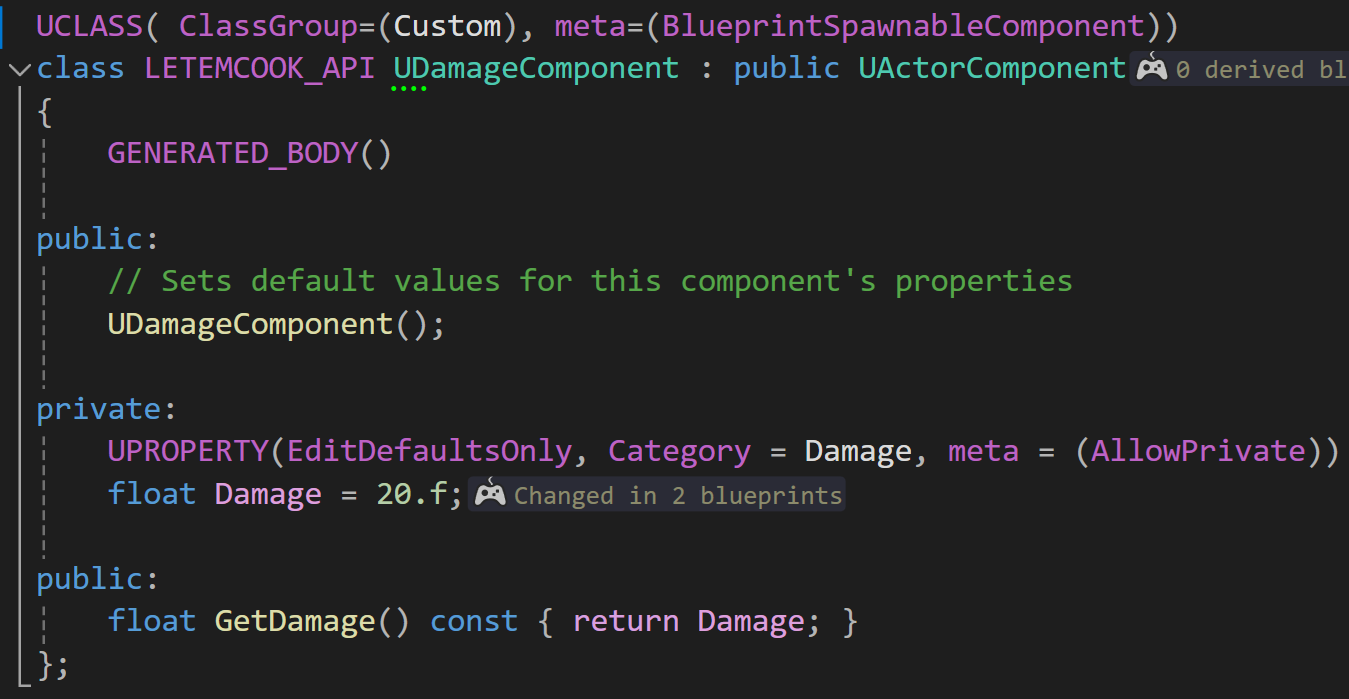
With the completion of the Projectiles and Collisions setup, the next step was to implement the Health and Damage functionality for our Characters.
This was a fairly straightforward approach. I simply created the following two ActorComponents.
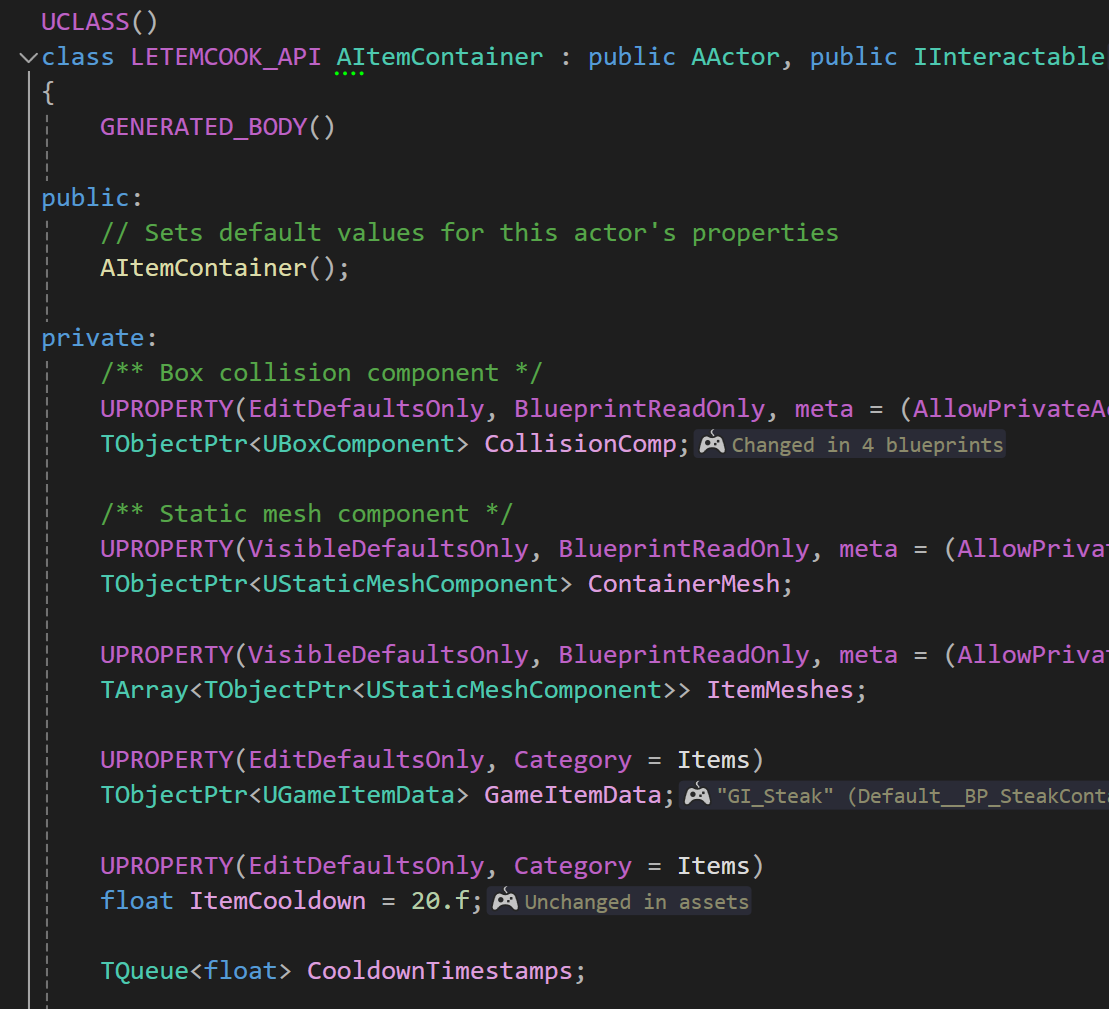
With that completed, it was time to proceed with setting up the containers. To accomplish this, I crafted a new class derived from AActor and implementing the IInteractable interface.
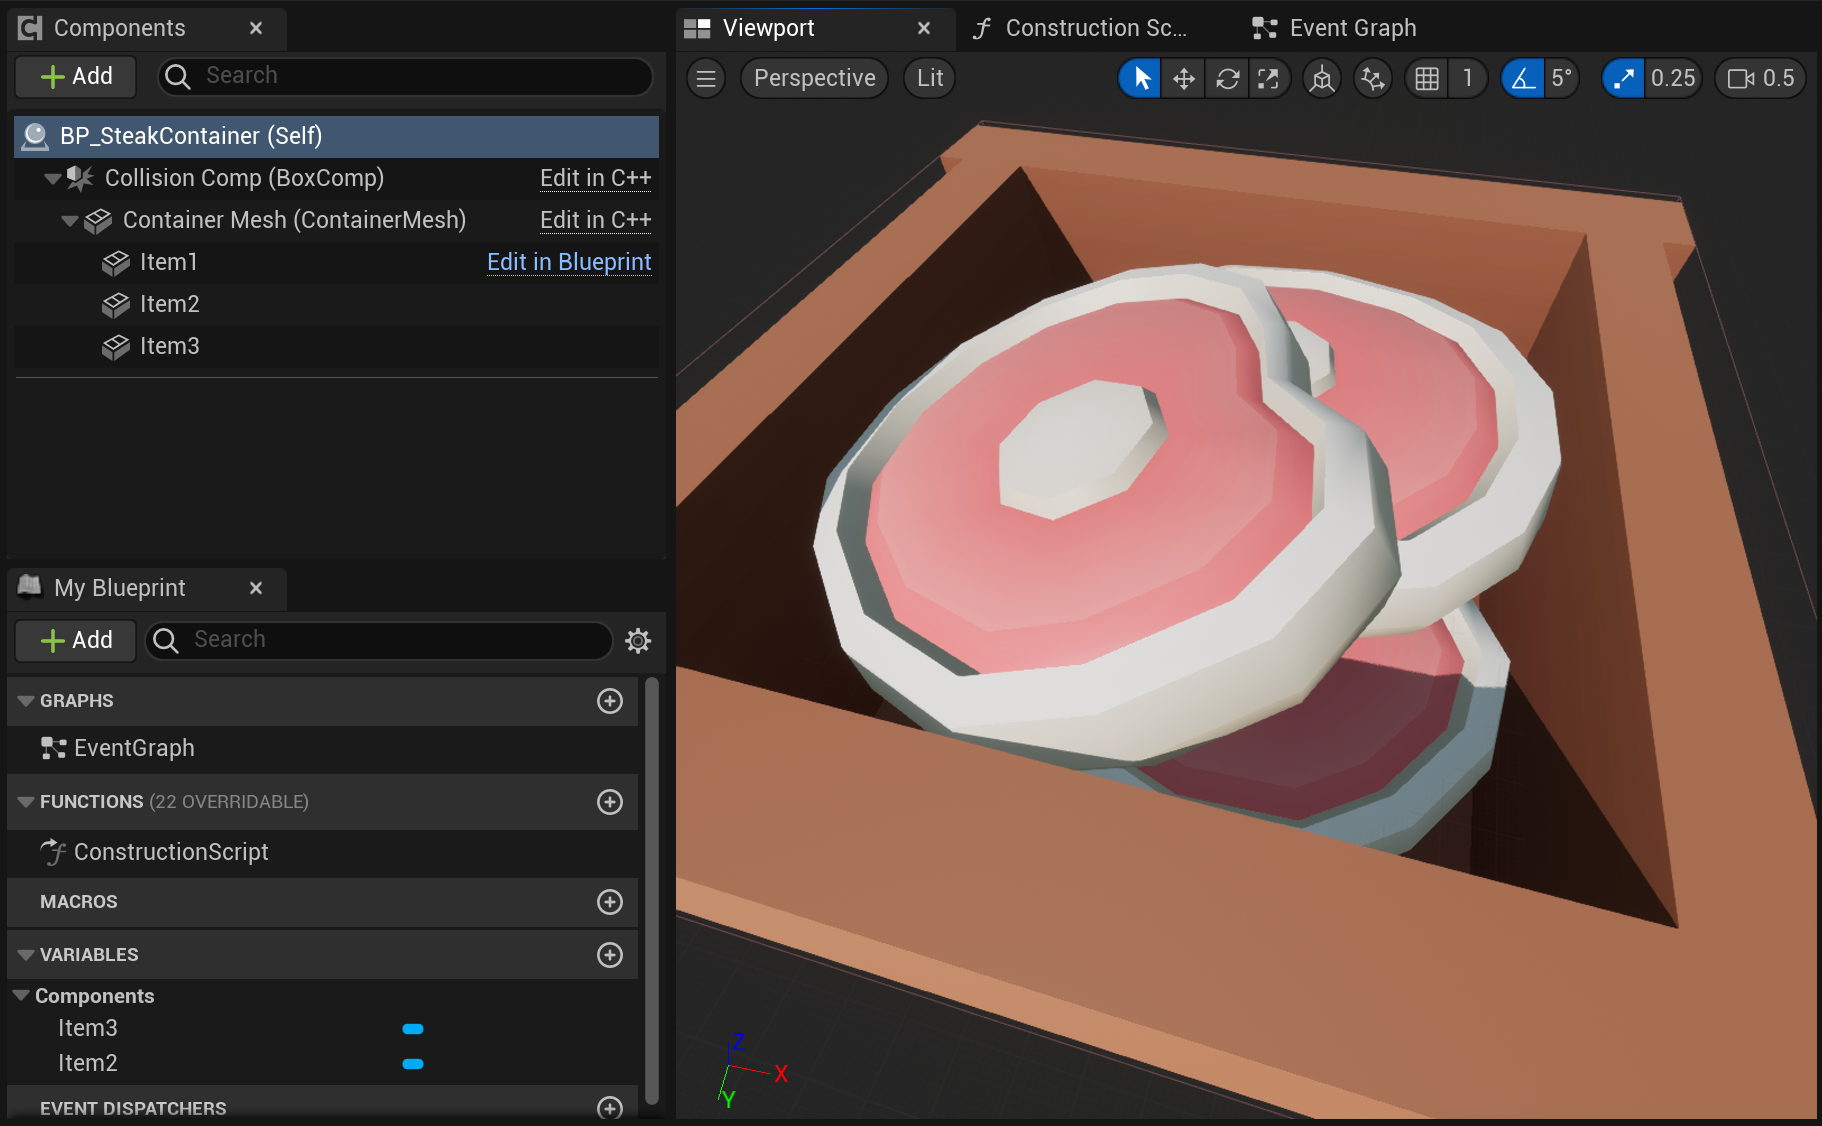
The initial concept for the container involved providing players with a set number of ingredients, which would subsequently respawn after a cooldown period. However, during the implementation process, I had the idea to enhance the functionality further. I decided to arrange the ingredient meshes in order within the container, making them disappear and reappear in the same sequence. This additional feature was intended to offer players additional visual cues and affordances.
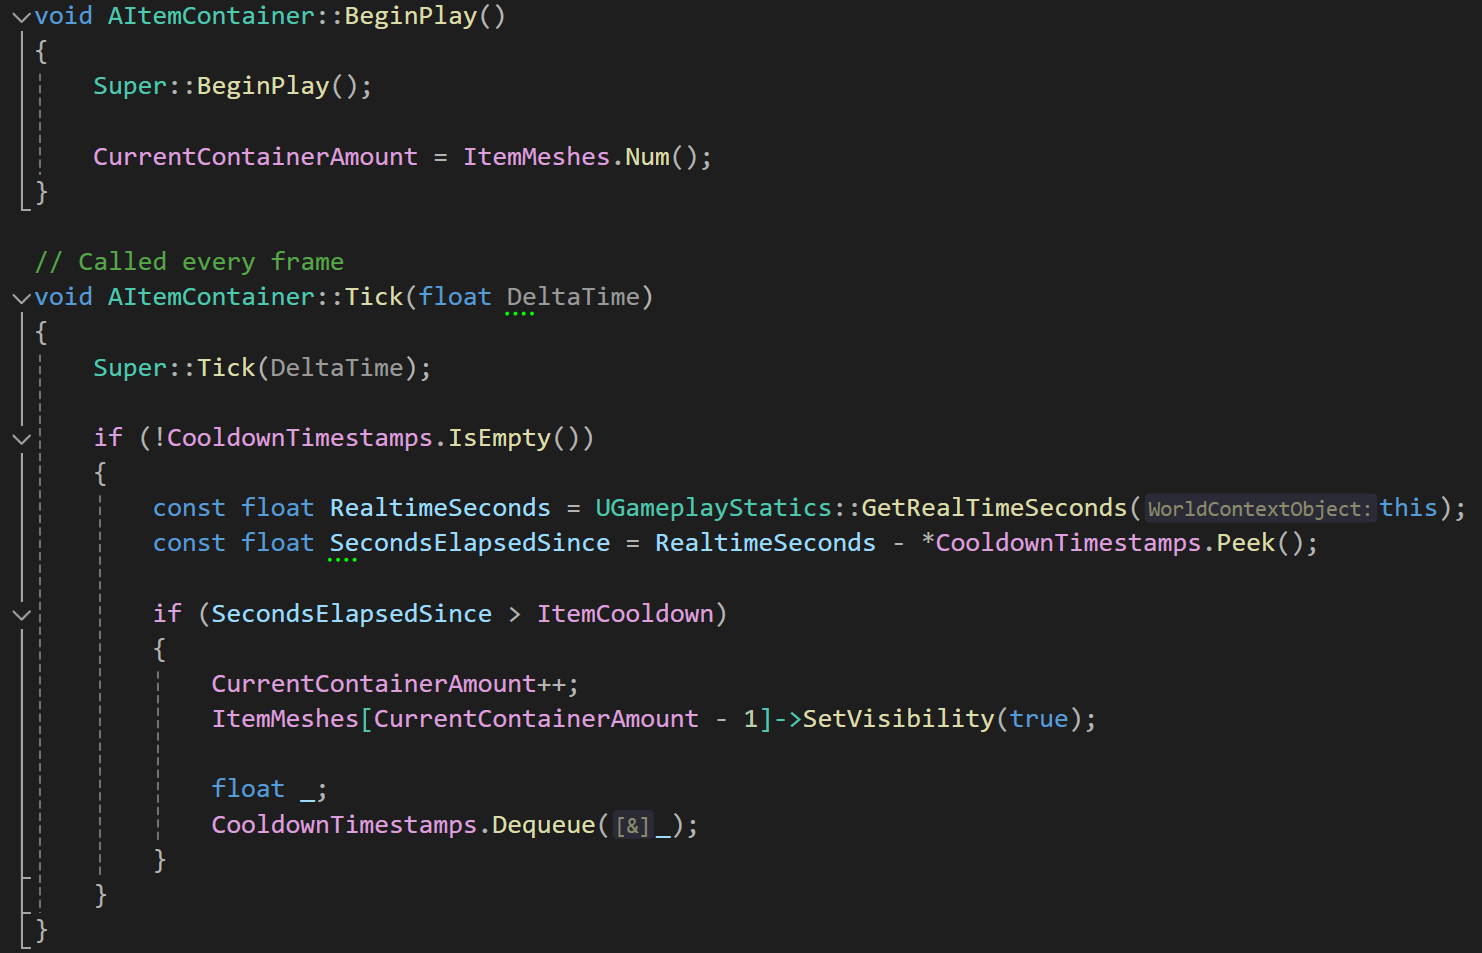
In BeginPlay(), it initializes the CurrentContainerAmount variable based on the number of item meshes, as set up in the blueprint.
The Tick() function is called every frame to handle cooldowns. If the CooldownTimestamps queue is not empty, it calculates the time elapsed since the earliest timestamp in the queue. If this exceeds the item cooldown period, it increases the CurrentContainerAmount, sets the visibility of the corresponding item mesh to true, and dequeues the cooldown timestamp.
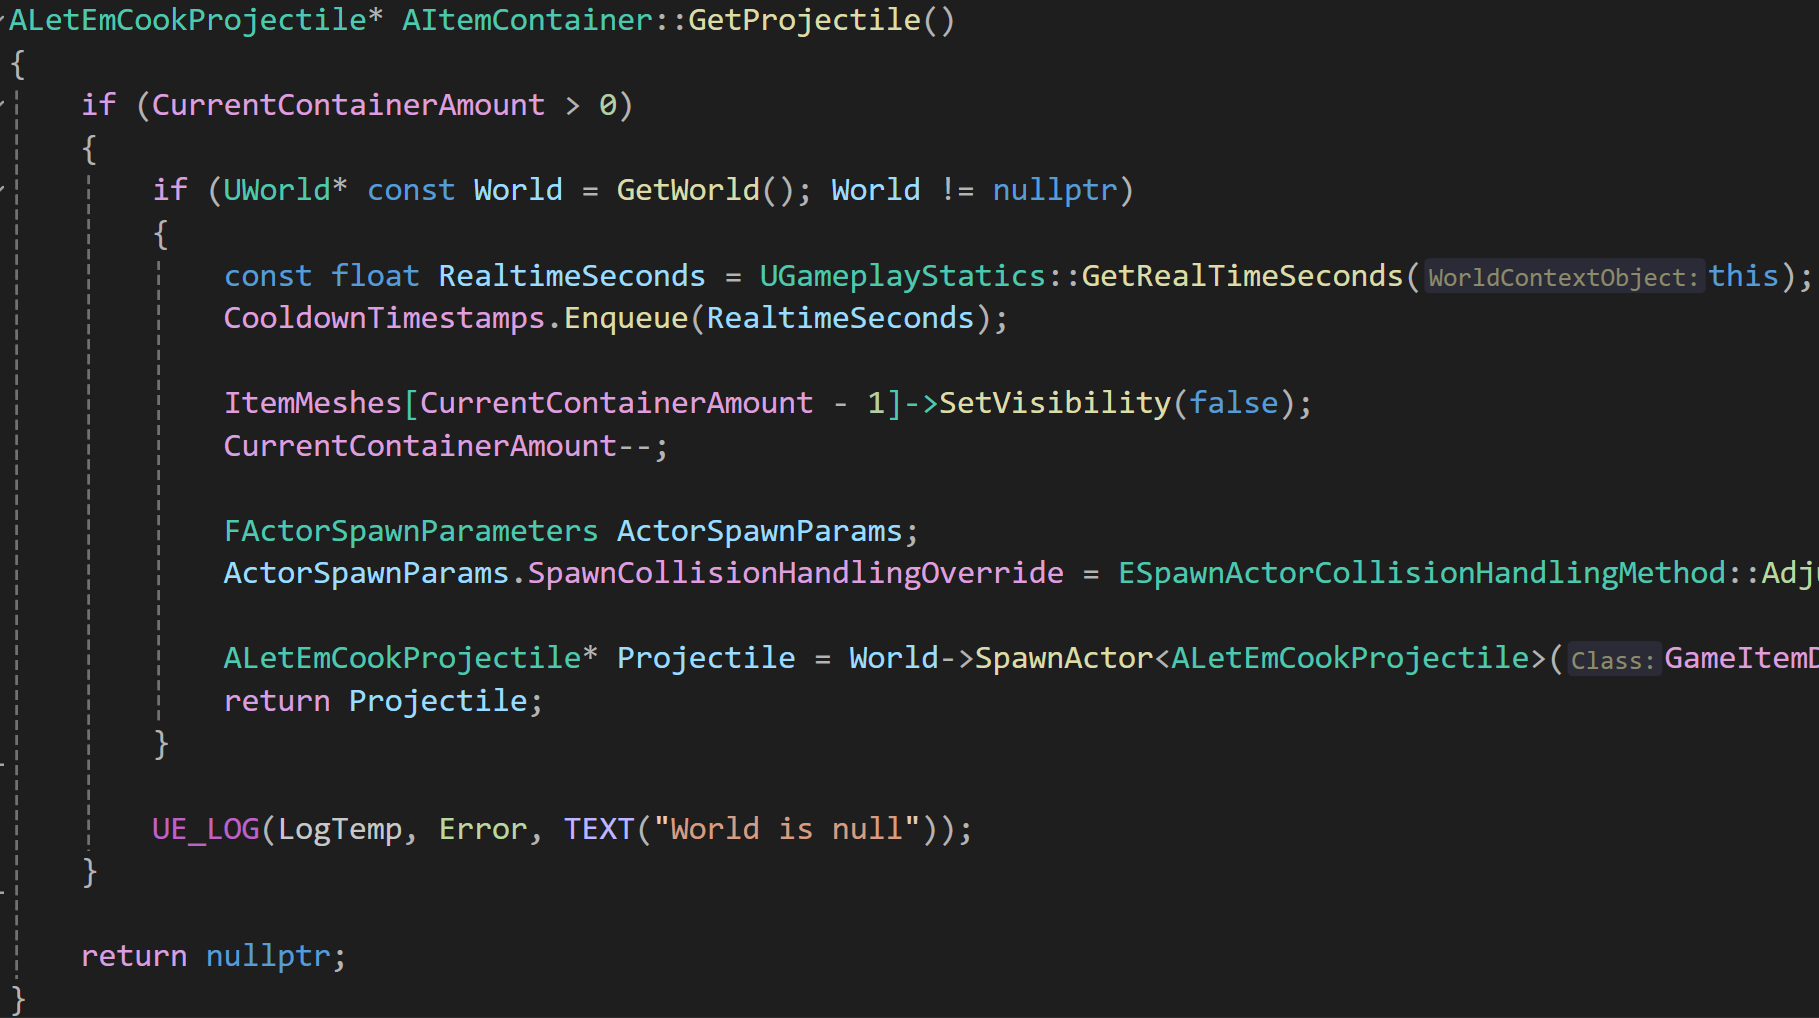
The GetProjectile() function is called to retrieve a projectile from the container. If there are available items in the container (CurrentContainerAmount > 0), it enqueues the current time to CooldownTimestamps, hides the corresponding item mesh, decreases the CurrentContainerAmount, and spawns a projectile at the container's location.
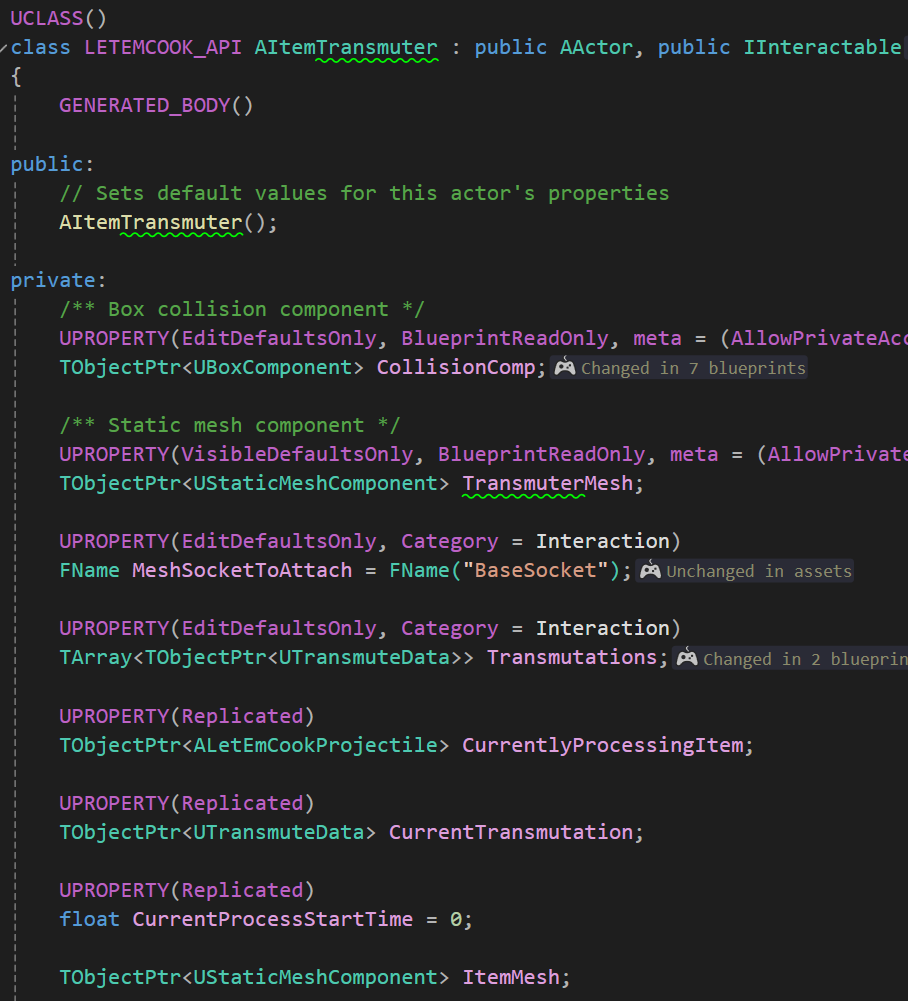
The ItemTransmuter, another class derived from AActor and implementing the IInteractable interface, serves as a blueprint for objects in the game, such as stoves and ovens that alter the state of ingredients over a specific duration.
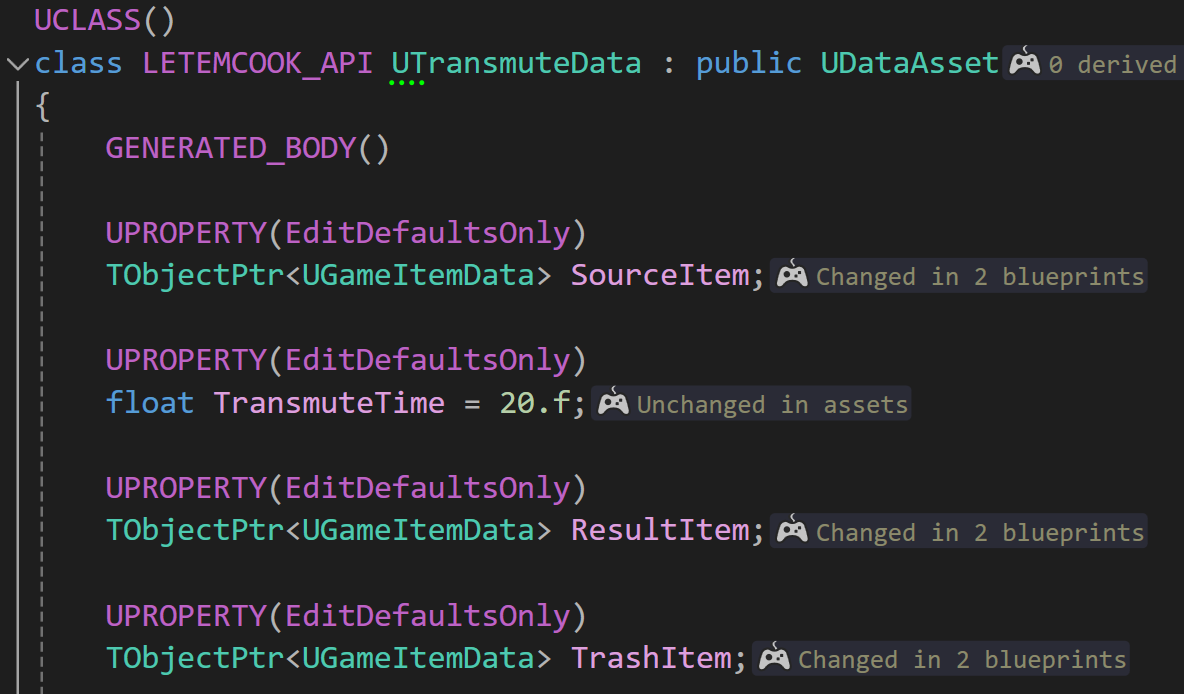
The TransmuteData is a DataAsset that encapsulates the way a Transmuter changes the Ingredients. It defines the source item, the transmute time, the resulting item, and the trash item. This data structure essentially dictates the transformation process handled by the ItemTransmuter class, specifying the input and output items, as well as the duration of the transmutation.
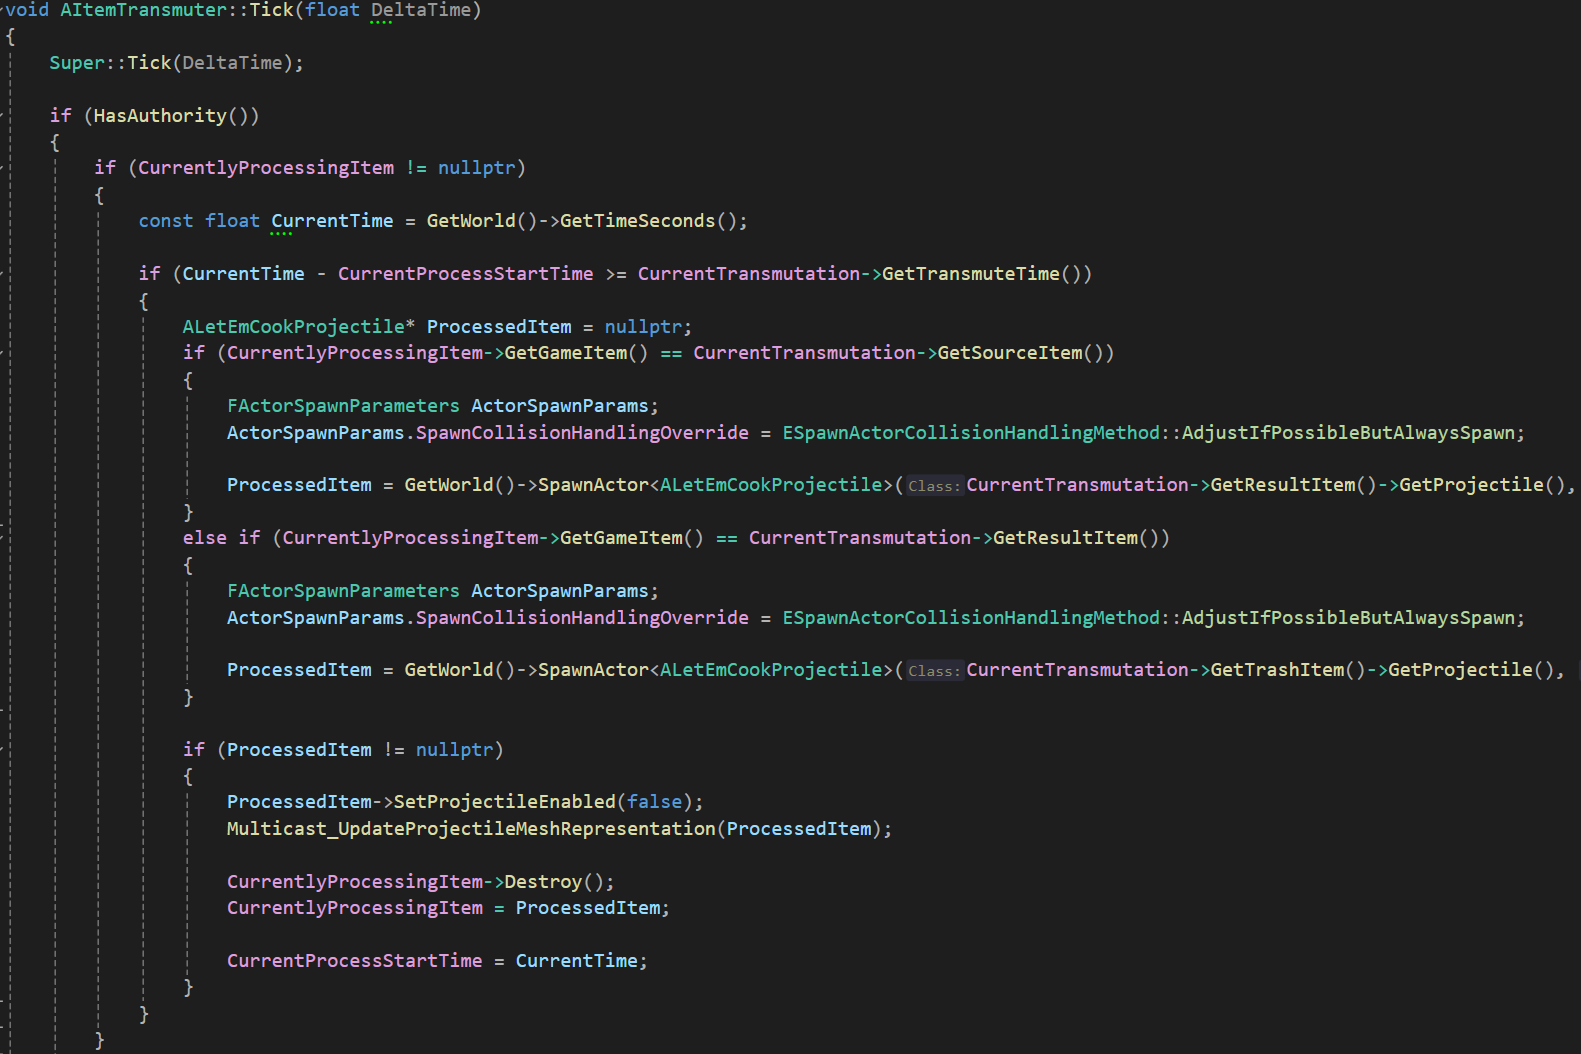
This code block checks if there is an item currently being processed for transmutation. If so, it calculates the elapsed time since the transmutation process started. If the elapsed time exceeds the transmutation time specified by CurrentTransmutation->GetTransmuteTime(), it spawns a new projectile representing the transmuted item.
The type of transmutation (e.g., source item to result item or result item to trash item) is determined based on the CurrentlyProcessingItem's game item and the CurrentTransmutation settings. The new projectile is spawned at the transmuter's location and replaces the currently processing item. Finally, the transmutation process start time is updated to the current time.
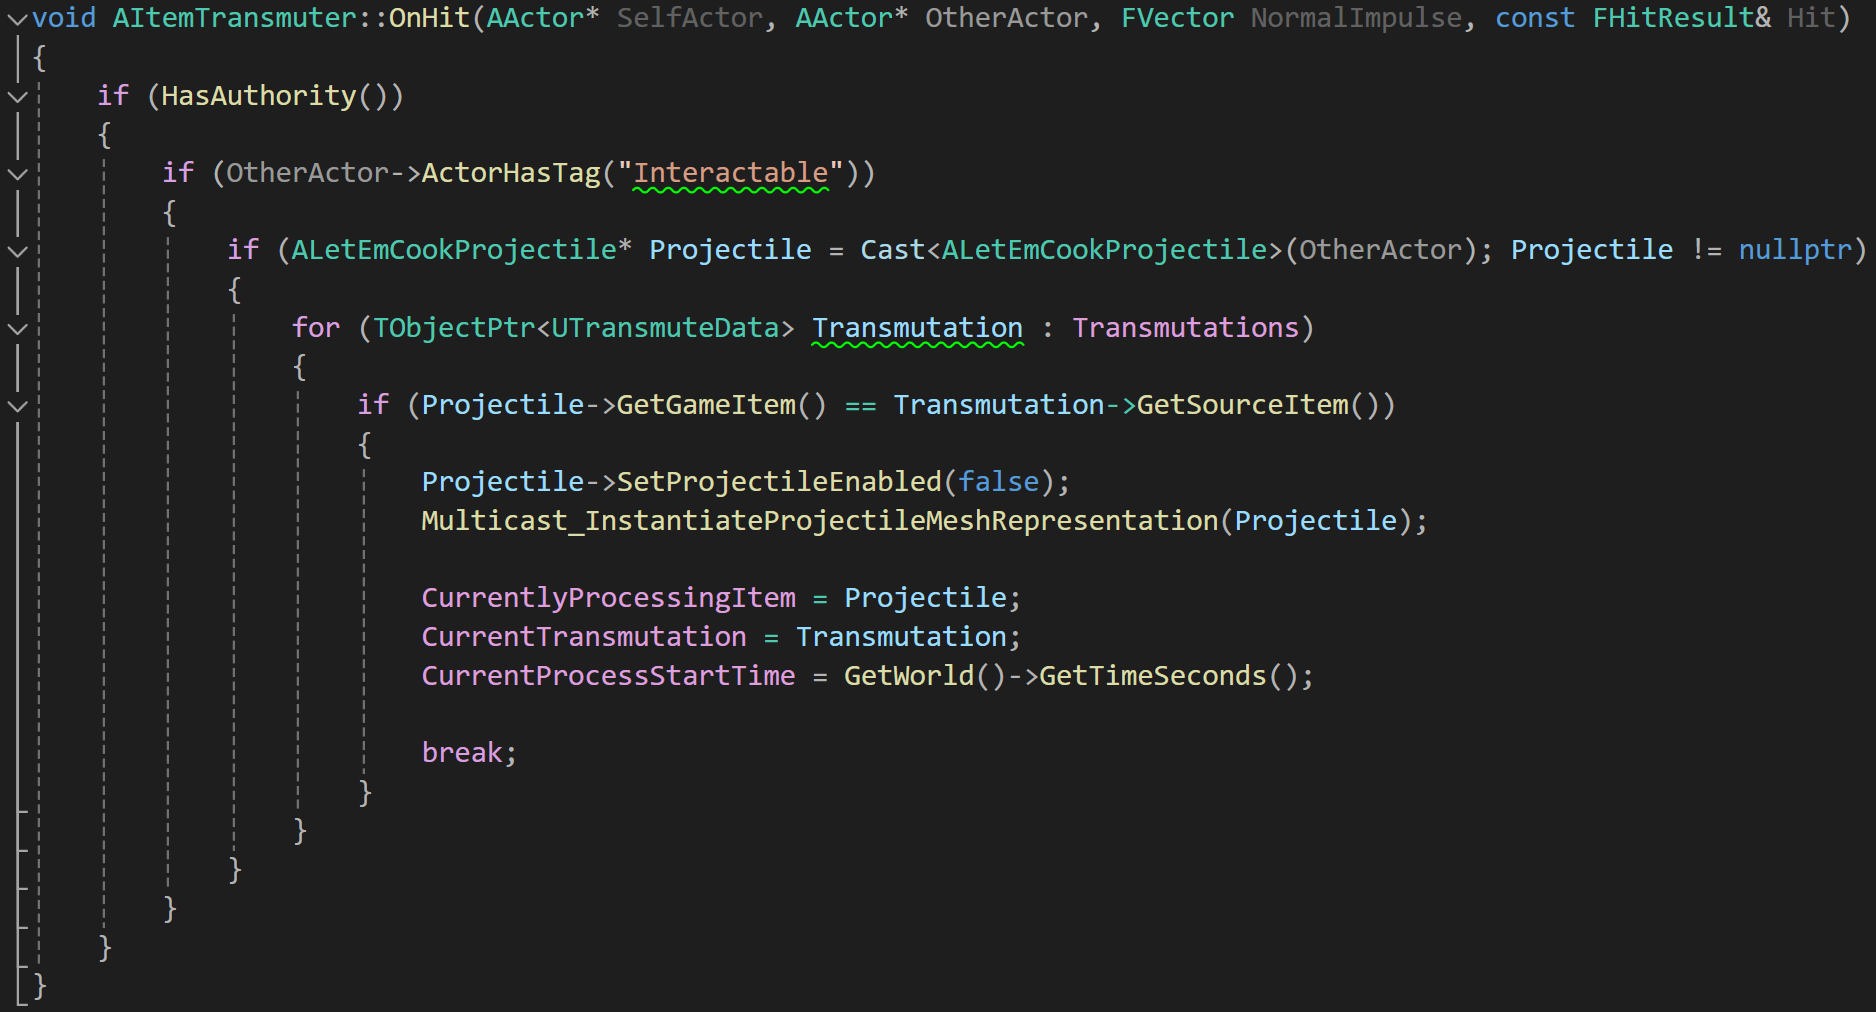
The OnHit() function triggers the transmutation process when a projectile collides with the transmuter. It identifies the source item of the projectile and selects the appropriate transmutation for processing.
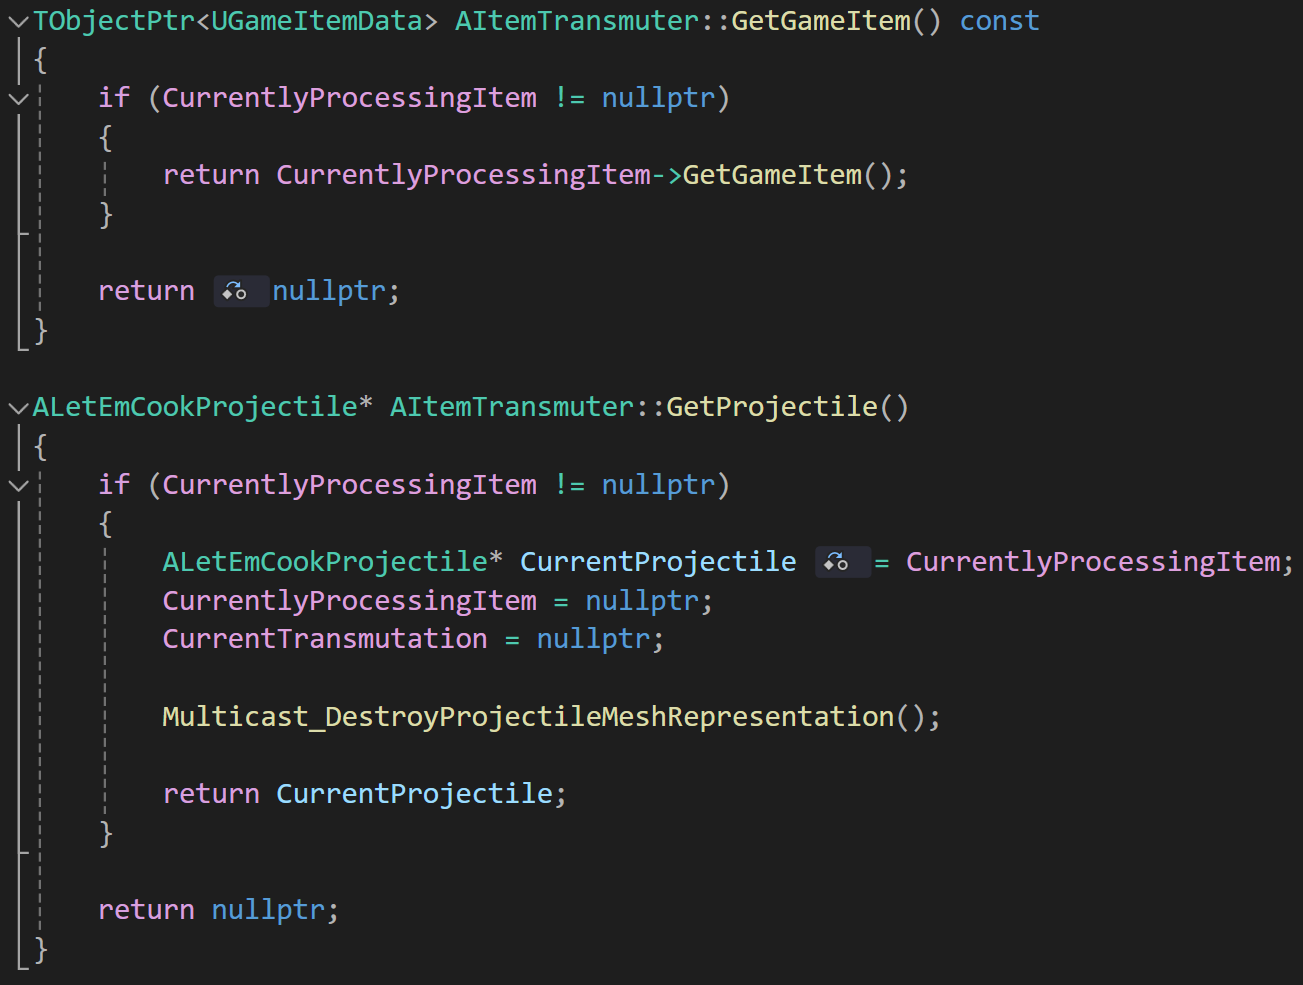
GetGameItem() retrieves the game item data associated with the currently processing item. It checks if an item is currently being processed, and if so, returns the game item data of that item. The GetProjectile() returns the currently processing projectile and resets the processing state. If an item is currently being processed, it returns the projectile associated with it, sets the processing state to nullptr, clears the current transmutation data, and triggers the destruction of the projectile mesh representation.
As the deadline for the final class presentation approached, the team worked to consolidate all components. This included integrating the UI, finalizing animations, and completing the level design.
This is what it looked like.
This week I realised that there was an issue with the setup of the interaction pipeline for the projectiles.
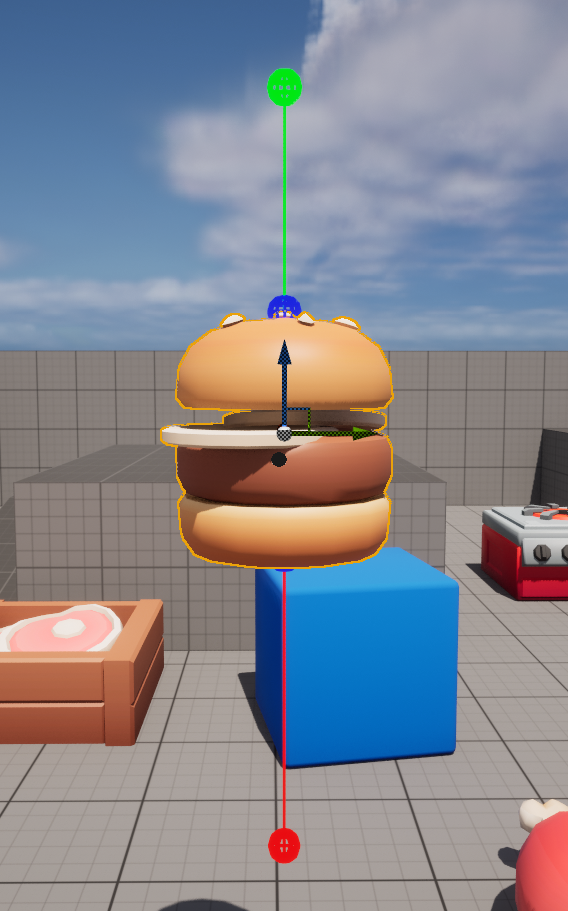
The problem has to do with the interactions regarding Ingredients that have multiple forms. Let’s look at an example for clarity: suppose we have a burger, the burger is made up of the buns, a patty, a piece of cheese and a slice of lettuce.
Employing the previous setup would necessitate creating interactions for the burger with solely the bun, then with just the patty and buns, and so forth, for each possible combination of ingredients. This was highly unfeasible and an absolute nightmare. And so, I had to figure out a way to solve this issue.
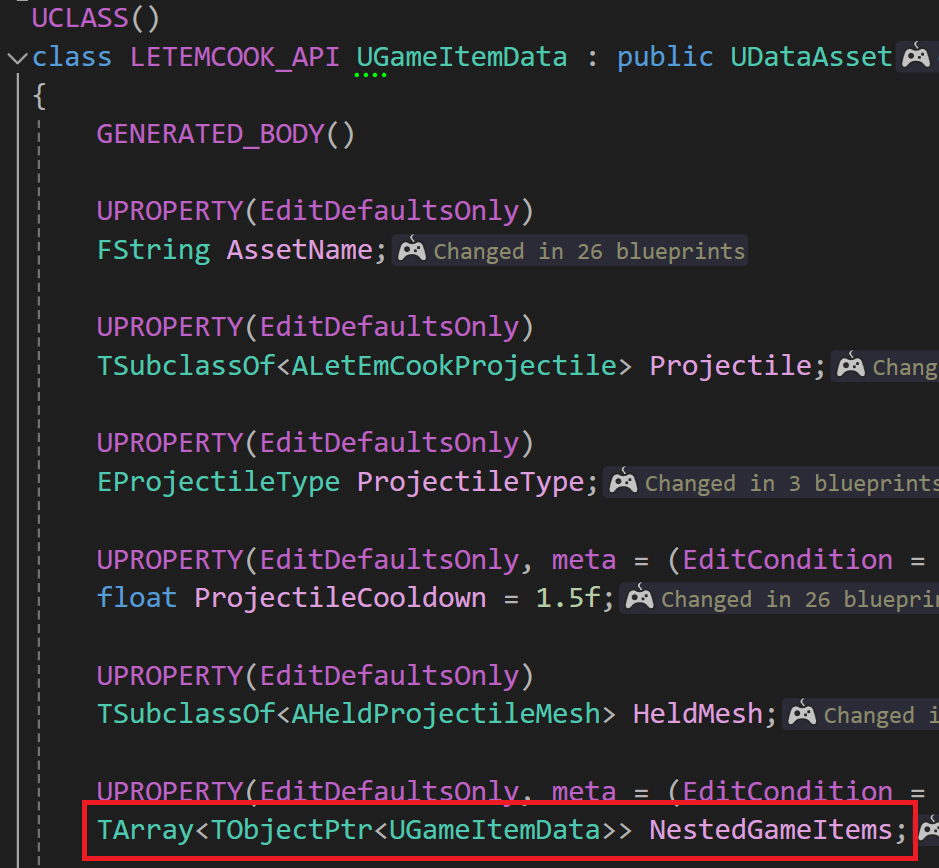
I began by adding an array of GameItemData references to the GameItemData class itself. This nested approach meant that the burger’s data would have a list of relevant data within itself.
I then had to adapt the collision pipeline accordingly, although I haven't reached that stage yet. This is because I realised the necessity of introducing a new projectile type capable of tracking the ingredients it holds and updating their representation accordingly.
However, the concept behind the collision pipeline is straightforward. Instead of instantiating the resulting item upon collision between two items, we inform the nesting item that it now contains the other item. For instance, if a burger composed solely of buns collides with a lettuce slice, the lettuce mesh on the burger projectile is activated, and the burger's internal state is updated to reflect its acquisition of the lettuce.
I was aware that the representation would vary depending on the type of item. For example, a burger may need to expand or contract based on its ingredients, while a soup would maintain its constituents' positions, merely requiring visibility adjustments.
Therefore, I devised the ModularProjectile abstract class to serve as the blueprint for all projectiles with the specified requirements.
The AdjustProjectileState() function is an abstract method that will be further developed by inheriting classes. It outlines how the Projectile should modify its mesh representation, colliders, etc., in response to added ingredients. The next logical step would involve implementing functionality to update and monitor the ingredients it contains through collisions, but for this week my update includes establishing the code for the burger's mesh and collision adjustments.
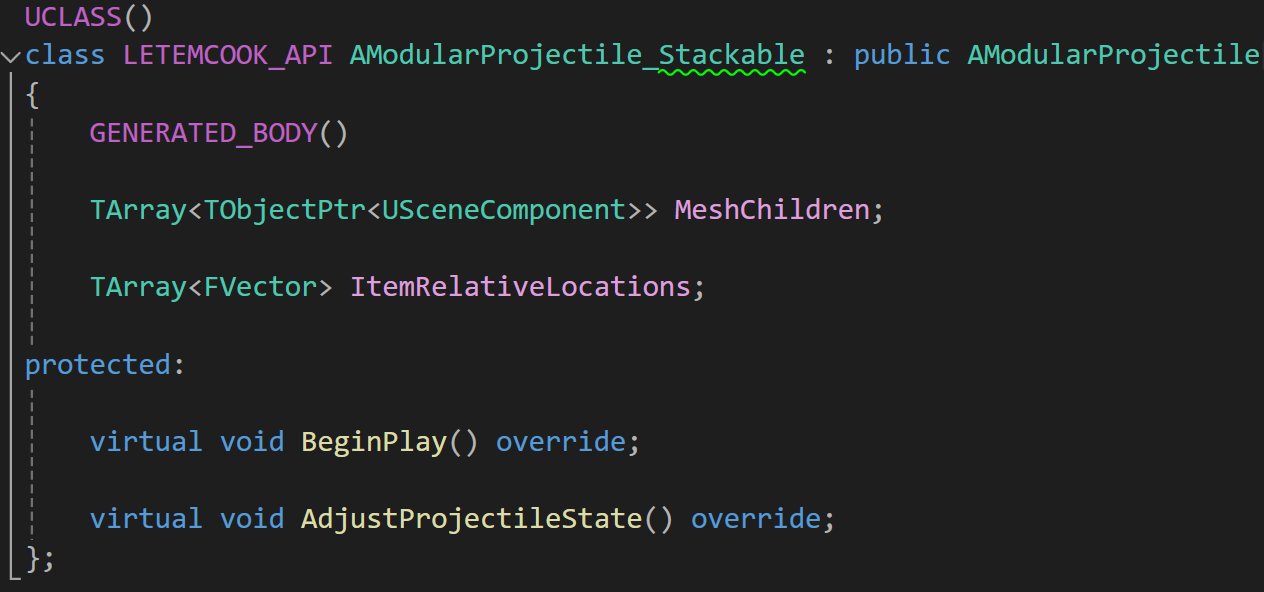
To achieve this, I introduced the ModularProjectile_Stackable class. This functionality extends beyond just the burger; it can be applied to any food item that requires stacking along a specific direction.
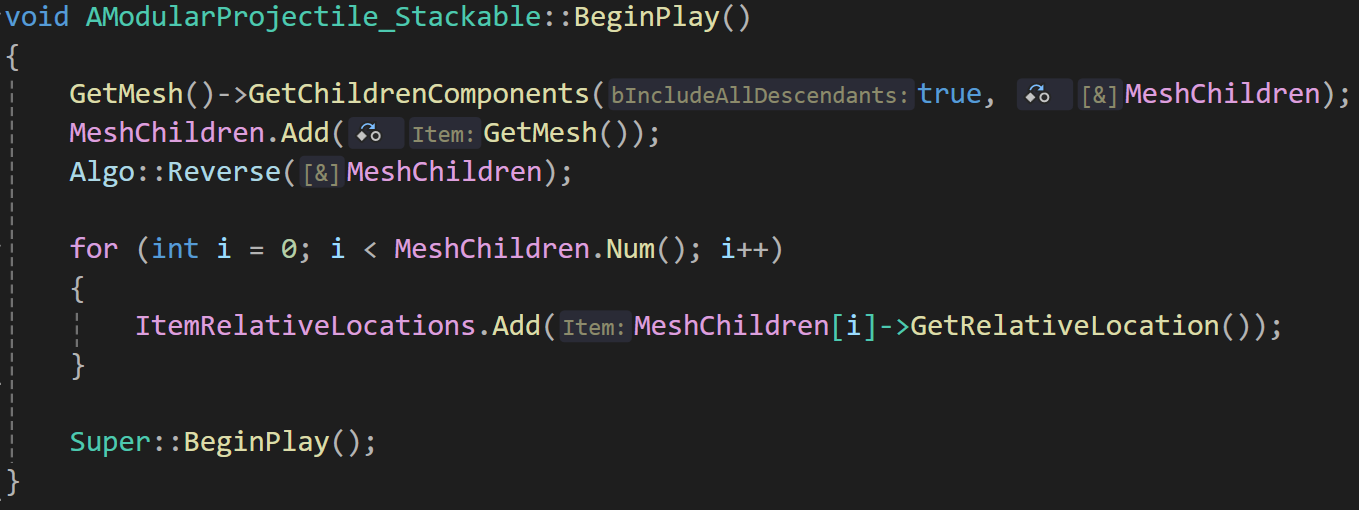
This code initializes the ModularProjectile_Stackable class. It retrieves all child components of the mesh, including the mesh itself, and stores them in an array called MeshChildren. The relative locations of these child components are then stored in an array called ItemRelativeLocations.
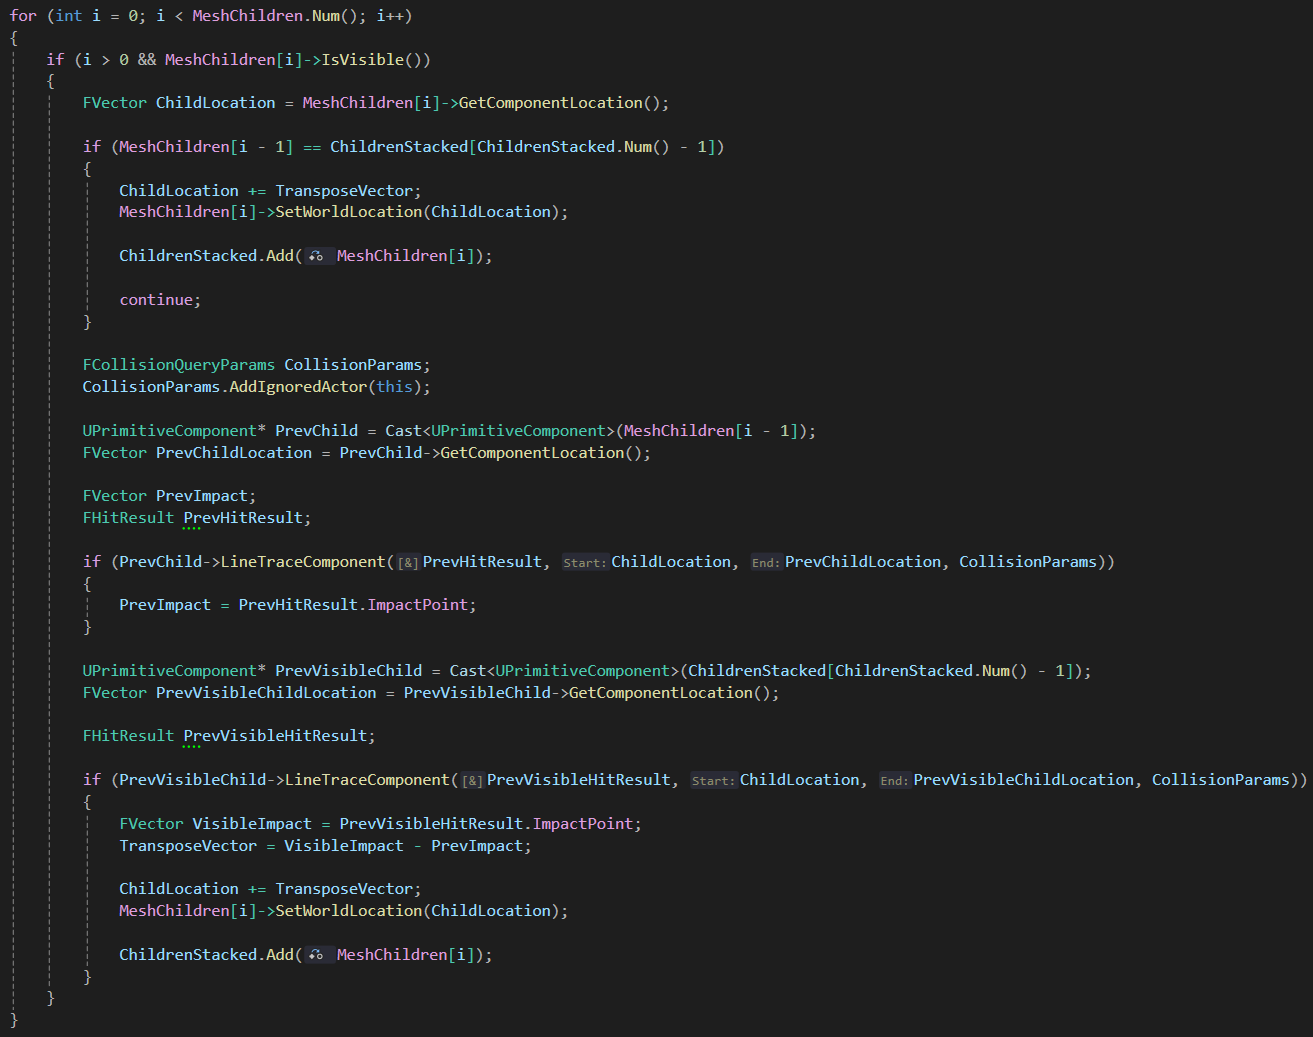
This code, part of the AdjustProjectileState() function, handles the adjustment of mesh representations, specifically the positions of child meshes. This code is to be called after the collision takes place and the internal representation of the data, alongwith the visibility of the relevant meshes, are updated.
First, the code aligns child components of the mesh based on their relative locations. Then it iterates through the child components, stacking visible components on top of each other while avoiding collision. It checks if the current child is visible and if it's not the first child. If it is visible and not the first child, it performs collision checks with the previous visible child to determine if adjustment is needed to prevent overlap. It uses line tracing to detect collisions and calculates a translation vector to move the current component to a non-colliding position above the previous visible child. Finally, it updates the world location of the current component accordingly.
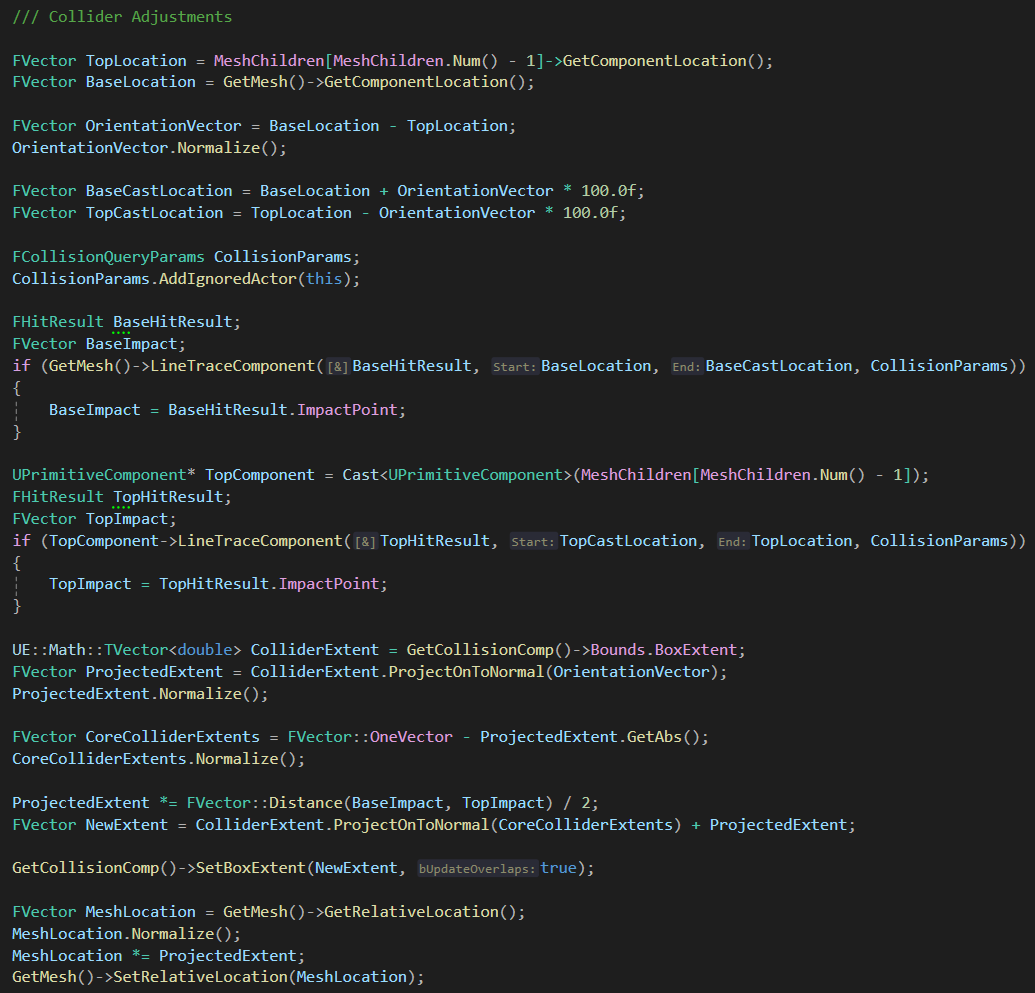
The next part of the AdjustProjectileState() function handles adjusting the collider’s size to be in-sync with the size of the mesh representation.
Here's a breakdown of what each part of the code does